Salt is generally considered to be one of the four basic ingredients in bread (along with flour, water, and yeast). It contributes to flavor, of course, but also reinforces the gluten structure, controls (by slowing) the rate of fermentation, inhibits the oxidation that breaks down color- and flavor-enhancing pigments, and enhances the keeping quality of the bread. A dough without salt is likely to be sticky, slack, and hard to work with, and the resulting bread lacking in flavor and shelf life.
That said, there is one bread that is typically made without salt: Tuscan bread. The reason for the saltlessness is unclear; some sources say tha centuries ago, the government levied a hefty tax on salt that the Tuscans didn’t want to pay. Whatever the reason, the strong flavors of Tuscan cuisine are well-suited to a less strongly-flavored bread. This type of bread, which stales quickly, is apparently traditional for panzanella (tomato-bread salad).
For my first attempt at saltless bread, I adapted the Tuscan Bread recipe in Peter Reinhart’s The Bread Baker’s Apprentice. This version was interesting to me because it employs a technique in which a portion of the flour is mixed with boiling water into a paste the night before baking. This gelatinizes the starches in the flour, Renhart explains, which brings out distinct flavors that enhance the bread’s unique quality. The Tuscan Bread recipe in The Village Baker by Joe Ortiz includes a similar paste, which Oriz refers to as the bouillie (mush).
I did find the dough to difficult to work with. Its sticky, inelastic consistency reminded me of chocolate chip cookie dough, minus the chips. I was just barely able to pull the slightest semblance of a very fragile windowpane by the end of the mixing. However, after the bulk fermentation (during which I added a fold that the original recipe does not call for), it was definitely manageable, if still a bit sticky.
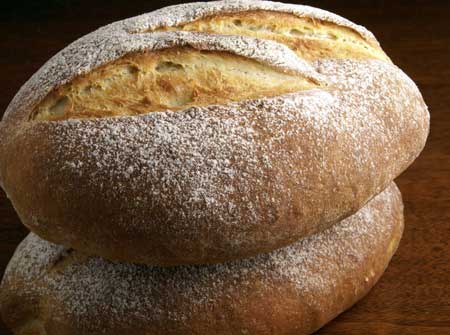
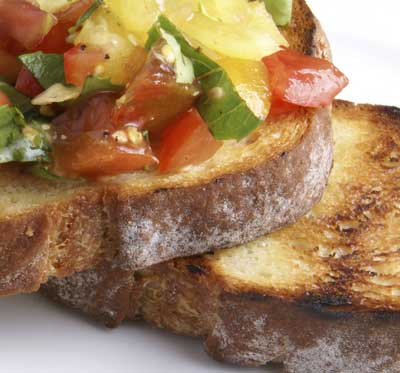
I had never eaten saltless bread before, and honestly, I was expecting to not care much for it, but I was pleasantly surprised. It is amazingly sweet, with a soft, compact crumb. Not my favorite bread, to be sure, but I was a long way from hating it. It made a very nice, if different, bruschetta with basil and tomatoes from my garden, supplemented by more tomatoes from the new organic farm within walking distance (!!) of my house.

Tuscan Bread
Yield: 1100 g (2 loaves)
Time:
- Soak flour paste: 12 hours
- Mix final dough: 15 minutes
- First fermentation : 2 hours, with a fold at 1 hour
- Preshape, rest, and shape: 20 minutes
- Proof: 1 hour
- Bake: 35 minutes
Desired dough temperature: 77F
Flour Paste Ingredients:
- 256 g flour
- 398 g boiling water
Final Dough Ingredients:
- 341 g flour
- 114 g water
- 8 g (2.5 t.) instant yeast
- 28 g (2 T.) olive oil
- all of the flour paste
Method:
- Make the flour paste: In a bowl, pour the boiling water over the flour. Stir until you have a smooth, thick, homogenous paste. Cool, then cover and let rest for about 12 hours.
- Combine all of the final dough ingredients. Mix by hand or with a mixer on low speed until combined. Adjust the water as needed to achieve a medium-soft consistency.
- Continue mixing (by hand or mixer on medium speed) to low level of gluten development. This took me about 10 minutes by machine, but will depend on your mixer.
- Transfer the dough to a lightly oiled container. Cover and ferment for 2 hours, with a fold after the first hour.
- Turn the dough onto a floured counter and divide it in half. Preshape the pieces into balls, trying to degas them as little as possible. Let the balls rest, covered, for 15 minutes.
- Shape the dough into batards, again tryng to minimize degassing of the dough. Place the shaped batards, right-side-up, onto a piece of parchment paper the size of your baking stone.
- Proof, covered, for about one hour.
- Meanwhile, preheat the oven, with baking stone, to 500F. You will also need steam during the initial phase of baking, so prepare for this now.
- Just before baking, sift flour on the tops of the batards and slash them with two overlapping slashes running nearly parallel to the long axis of the loaf.
- Slide the parchment, with the loaves on it, onto the baking stone. Reduce the temperature to 450F. Bake for 10 minutes with steam, and another 20 – 25 minutes without steam. The loaves should be a rich golden color. Then turn off the oven and leave the loaves in for another 5 minutes, with the door ajar.
- Cool on a wire rack.
Walking distance! You very lucky woman!
Love the way this toasted.
This is one long on my list to try and this technique is fascinating.
The loaves look lovely. I am a huge fan of tomatoes (and bruschetta) and this will be a great way to enjoy both.
Wow – I’d love a farm within walking distance. And the idea of making a paste the night before is definitely an interesting technique. Off the beaten path, so this might have to go in my list of breads to bake – it gets longer every day!
So cool! I admit I would not expect to like it either, but you have intrigued me….
Susan,
You are right in pointing out about the taste. I baked these last night and agreed with you; these wont be my favorites but I am glad I tried those.
About the stickiness: we, Asian bakers, are used to bake with water roux (slur). The best way to reduce stickiness is to use a gelatinized slur (mix the flour and cold water in a sauce pan and then boil them for 2-3 minutes). Cool, then use. I used this method and found no problem with stickiness despite my hand kneading.
Funny thing… today my boyfriend made a delicious lunch for us of eggplant-tomato-basil pizza with an unsalted crust. It led us to talk about saltless Tuscan bread. Daniel Leader in his book Local Breads has a wonderful chapter on it. I think I’ll have to try this recipe and one of Leader’s recipes soon to compare.
Thanks, as always, for the wonderful post.
If you say it was amazingly sweet, then I’ll give it another try. The first (and only time) I had saltless bread, it was terrible. But I guess like anything, it depends on the recipe and who’s doing the baking. Yours looks absolutely delicious.
Those boules look great. Loved the crusty look and the rich colour!
This would be great with thick tomato-based stews. I tried the same recipe from BBA but it didn’t look as good as yours. I had the same reaction to the taste — not bad but not my favorite either.
Reminds me of when I first arrived in Florence – looking for work, straight off the train from London. I didn’t have much money so decided the cheapest option would be bread, cheese and some mineral water (it was early September and hot). I got a big bottle of Panna water, some semi hard cheese and a great crusty chunk of real Tuscan bread and settled down to a taste sensation – it was my first ‘real’ Italian meal. I can still remember the disappointment!
I am a fearless novice baker that made this recipe today. I was looking to duplicate a “Rustic Tuscan” bread from the Breadworks in Pittsburgh. My crumb turned out to be relatively fine and uniform. Is this the expected results?
I was looking for a course crumb similar to that in the picture of your favorite sour dough. Any suggestions?
organic farms could actually save us from carcinogens and toxins-,`
What kind of flour did you use? Do you know if it was high or low protein? I understand that makes a huge difference.
LisaK, here’s the scoop on my flour: http://www.wildyeastblog.com/2008/06/23/flour-101/
Hi, pretty far out bread formulas you have in your blog! Just one comment about the Tuscan bread, though. I am pretty sure the real-thing that I grew up eating in Casentino, Tuscany, withous salt but graciously, nutty tasteful is made with a retarded sourdough. I have attempted it a few times but never came very close. It is slightly flat, the crust is not very colored, not even golden really, which suggests a very low baking temperature, and it is left unscored.