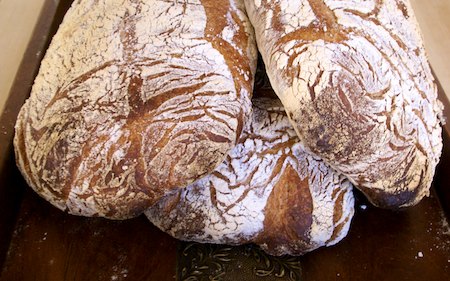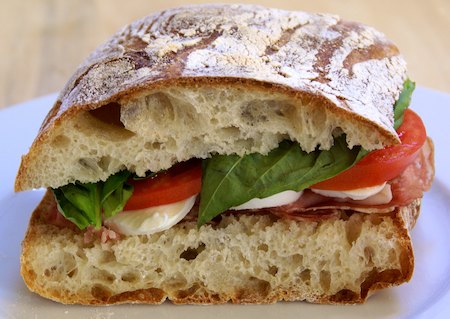
I made today’s ciabatta with a little more water than usual. I expected this would result in a more open texture, but it didn’t, perhaps because I mixed it a little too long. Take-home #1: all other thing being equal, higher hydration leads to a more open crumb. Take-home #2: all other things being equal, more mixing leads to a finer, more closed crumb. (You can see this effect dramatically in these baguettes.) Take-home #3: all other things are never equal.
I will say, however, that however open or not open the crumb, it made a pretty good sandwich with prosciutto, sopressata, mozzarella, basil, tomatoes, and balsamic vinegar.

Check out my videos on folding and shaping ciabatta.
Ciabatta
Yield: 1.5 kg (3 loaves)
Time:
- Mix and ferment poolish: 6 hours
- Mix final dough: 10 – 15 minutes
- First fermentation (in the refrigerator): 12 – 15 hours, with folding at the first 45 and 90 minutes
- Warm-up: 1 hour
- Divide: 5 minutes
- Proof: 2 hours
- Bake: 35 – 40 minutes
Desired dough temperature: 75F
Poolish Ingredients:
- 229 g flour
- 76 g whole wheat flour
- 304 g water at about 65F
- 1 g instant yeast (1/3 t.)
Final Dough Ingredients:
- 541 g flour
- 373 g cold water (about 40F)
- All of the poolish
- 17 g salt (scant tablespoon)
- 1.5 g instant yeast (1/2 t.)
- 26 g olive oil
Method:
- In a large bowl, mix all the poolish ingredients until just combined. Cover the bowl and let the poolish ferment at room temperature for about 6 hours. The poolish is ready to use when the surface is creased, and pebbled with bubbles.
- Place all of the final dough ingredients, except about 20% of the water, into the bowl of a stand mixer. Mix on low speed until the ingredients are incorporated, about 4 or 5 minutes.
- Continue mixing on low or medium speed until the dough reaches a medium level of gluten development.
- Add the remaining water and continue mixing until it is all incorporated and you have a dough that feels very soft but strong and springy.
- Transfer the dough to an oiled container, and leave it at room temperature until after the second fold. (If it is warmer than about 75F, refrigerate it right away.)
- Fold the dough at 45 and 90 minutes. Make sure the container is very well oiled after the second fold so the dough will not stick when it is turned out onto the counter later.
- After the second fold, refrigerate the dough for 10 – 14 hours.
- Take the dough out of the refrigerator and let it warm up for about one hour.
- Turn the dough out onto a very well floured counter (you really can’t get too much flour here; you want to make sure the dough doesn’t stick, and any excess will just be left behind on the counter).
- Working from the center towards the edges, very gently stretch the dough into a rectangle about 2 cm in height. Try to degas the dough as little as possible.
- With a dough scraper, cut the dough into three rectangles. Gently lift these pieces to a liberally-floured couche, supporting the entire piece from underneath with your flat hands, keeping the floured side of the dough down. Again, be very careful to degas as little as possible.
- Cover the couche with plastic or slip it, on a board or sheet pan, into a large food-grade plastic bag.
- Proof for about 2 hours at room temperature, until the dough is very light and full of gas.
- Meanwhile, preheat the oven, with baking stone, to 475F. You will also need steam during the initial phase of baking, so prepare for this now.
- Prepare a piece of parchment paper the size of your baking stone, and put it on a board or sheet pan.
- To transfer the loaves from the couche to the parchment, lightly sprinkle them with flour. Holding the edge of the parchment-covered pan right next to the edge of a loaf, grab the end of the couche, pull it taut and use it to flip the loaf over onto the parchment, so the heavily floured side is now up. Do this maneuver as gently as possible.
- To bake, slide the entire loaf-laden parchment onto the baking stone.
- Once the loaves are in the oven, turn the heat down to 450F. Bake for 8 minutes with steam, and another 20 minutes or so without steam. The crust should be a deepish golden brown. Once the crust is the color you want it, turn off the oven and leave the loaves in, with the door cracked open, for another 10 -12 minutes.
- Cool on a wire rack. Wait until completely cool to cut and eat.
Your sandwich looks so yummy.
what a great idea for such delicious ciabata!
Susan, I don’t know if it is the angle of the shot or what, but the crumb seems great to me….
I still haven’t made a ciabatta that pleased me in the “holes” department, I might give this recipe a try, now that I feel a bit more confident about high hydration doughs (I know I’ll pay for this statement soon enough…)
You go girl!
Beautiful bread! I want to try this recipe, maybe this weekend.
This ciabatta looks so beautiful. I adore the colour of the crust, as I tend to take mine out of the oven a bit to soon, so I don’t see this lovely burnt honey crust on them. Now, the sandwich – caused me uncontrollable mouth-watering and the addition of the fresh mozzarella to my shopping list. Thank you!
Here’s my ciabatta attempt:
http://majology.mymaj.net/food/ciabatta-oh-how-italian/
Hope you don’t mind me sharing.
The Ciabatta was the bread that seduced me into baking my own bread in the first place. And although you might not be as happy with your crumb, the photo there looks just beautiful. What a wonderful post– I will be trying this recipe for sure! Thank you!
All things are never equal. Kiddo, those look like very fine holes to me! Glorious ciabatta an WOW sandwich.
Hmmm, my husband favorite bread!
If I could make ciabatta like that, I’d open a bread store. This is perfection.
I think that is a lovely, amazingly open crumb! And a delicious-looking sandwich.
This recipe goes on my list for the holiday weekend. What a great way to start summer! Thank you, Susan!
looks absolutely delicious! it would be the perfect picnic bread.
I love a rustic ciabatta with a firm crust and lots of airy holes in the dough to go with pasta, etc.. But for sandwiches, I’d like the crust to be a bit softer, want the dough to rise a bit less and to have a smoother texture with fewer holes. Can you offer any suggestions about how to do this?
I am making ciabatta bread today. I hope my ciabatta comes out as beautiful as yours.
Susan, when you work with sticky dough like Ciabatta dough, how do you check the gluten development? Can you stretch the dough if it is so sticky?
Connie, I wet my hands before checking the gluten. Also, a soft dough is not necessarily a very sticky dough. It becomes less sticky the more the gluten is developed.
I am new to this and cant seem to get the holes through out and the end result still seems to doughy…any ideas
Erika, good ciabatta requires adequate hydration (water), sufficient mixing and folding for gluten development, a good shaping technique with gentle handling, and a hot baking stone. If you type “ciabatta” into the search box on my upper left sidebar, you will see more posts that may help you.
Hello —
I’ve had good luck with your other overnight recipe & I’m going to try this since I don’t normally need 6 loaves. I would, however like to try and use KA White Whole Wheat flour for at least part, if not all of the flour. Would you know what adjustments would need to be made?
Thanks for all the great info!