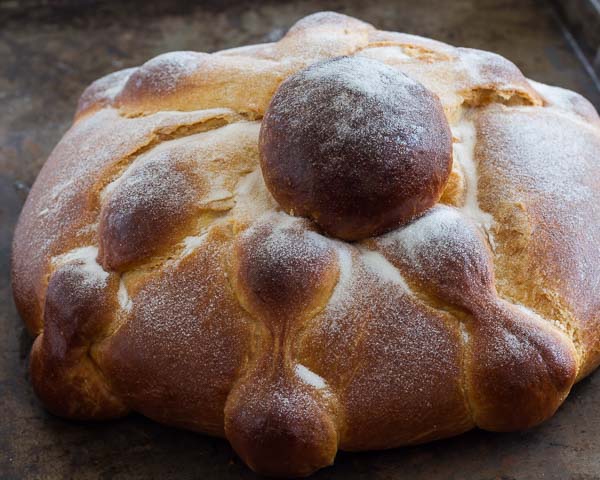
Pan de muerto is the traditional Mexican sweet bread eaten during Día de los Muertos, observed November 1 and 2 to honor loved ones who have died and celebrate the eternal cycle of life. The signatures of this soft, sweet, orange- or anise-scented bread are the “skull” and “bones” and that decorate its top and sides.
This pan de muerto recipe is richer in butter than one I have made in the past, and zestier with the use of sourdough starter. I present it in honor of mis muertos, who made my life richer and zestier in countless ways:
My father: Charles W. Tenney, Jr., a brilliant mind and playful wit, who encouraged me to dream first and ask questions later.

My maternal grandparents: Mary Strawson, who taught me to make things with my hands, and Stanton Strawson, who thought hammering together wooden vessels to float in the tide pool was a perfectly wonderful pursuit for little girls.

My paternal grandparents: Mildred Tenney, who loved nothing more than sitting down at the piano to play a lively tune, and Charles W. Tenney, Sr., who gave me stamps that inspired me to learn how to use an atlas and discover more about the big world out there.

Pan de Muerto
Notes:
- To make this bread without sourdough starter, increase the flour to 728 grams, the yeast to 9 grams, and add 208 grams of water. Expect shorter fermentation times.
- Pay attention to the mixing technique described below. For enriched, sweet doughs, the butter and sugar need to be added at precise points in the mixing so that they do not impede the development of the gluten that will support these weighty ingredients. Don’t be alarmed if the mixing process takes half an hour or so.
- In place of the orange blossom water, you can use the grated zest of a large orange and/or a teaspoon of whole anise seeds.
- If you don’t have osmotolerant yeast, regular dry instant yeast works, too; just add a pinch more.
- The easiest way to soften butter is to leave it at room temperature overnight.
- I used the same amount of dough for each “skull” as for the other “bones;” however, you could make the skulls a bit smaller.
- The recipe makes two good-sized loaves. They will fit together on a large (3/4-sheet-size) baking pan, if your oven can accommodate one. If you have a smaller oven or baking sheets, cut the recipe in half or bake the loaves one after the other.
Yield: 1700 g (2 loaves)
Approximate times:
- Mix: 25 minutes
- First fermentation : 2 hours at room temperature, then overnight in the refrigerator
- Divide and shape: 20 minutes
- Proof: 3 hours
- Bake: 40 minutes
- Finish: 10 minutes
- Cool: 2 hours
Desired dough temperature: 78F
Dough Ingredients:
- 520 grams flour
- 5.2 grams (1 3/4 teaspoons) osomtolerant instant yeast (SAF Gold)
- 7.8 grams (1 1/3 teaspoons) salt
- 13 grams (2 1/2 teaspoons) orange blossom water
- 270 grams (5 whole) eggs at room temperature
- 416 grams mature 100%-hydration sourdough starter
- 177 grams sugar
- 291 grams butter, cut into 1-inch pieces, softened and at room temperature
Finishing Ingredients:
- one egg
- a pinch of salt
- 2 tablespoons clarified butter
- fine (or regular) granulated sugar
Method:
- In the a bowl of a stand mixer fitted with a dough hook, combine the flour, yeast, salt, orange blossom water, eggs, and starter.
- Mix on low speed until all of the ingredients are incorporated.
- Turn the mixer speed to medium-low and continue mixing until the dough has reached a medium level of gluten development.
- As you continue to mix, add the sugar in 5 or 6 batches. After each addition, mix for a minute or two before adding the next one.
- Continue to mix until the dough reaches full development. The dough should be pulling away from the bowl.
- Add the softened butter all at once. Mix on low-medium speed until it is fully incorporated and the dough has returned to full gluten development. (You may need to stop the mixer periodically to corral stray chunks of butter adhering to the side of the bowl.)
- Transfer the dough to a lightly buttered container. Cover and ferment at room temperature until the dough feels “lively” and is nearly doubled in bulk. This may take more or less two hours, depending on your room and dough temperatures.
- Line a baking sheet with parchment paper and lightly flour the paper. Pat the dough into a rectangular(ish) slab on the paper. Slide the sheet into a plastic bag and refrigerate overnight.
- Turn the cold dough onto a lightly-floured counter. Separate off 8 pieces of 30 grams each. For each loaf, 3 pieces will be used for the bones, and one for the skull. Divide the remaining dough into two halves.
- Line a large or two small baking sheets with parchment.
- Shape each large piece of dough into a ball; these will be the main loaves. Place them on the parchment-lined sheet(s) and flatten slightly.
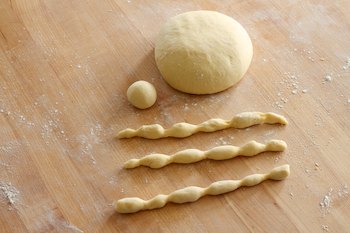
- Shape two of the small pieces into balls for the two skulls. For the bones, roll the remaining dough into snakes about as thick as an index finger. Using a single finger, roll the snakes to a very thin diameter at several intervals, to give them the look of knobby bones.

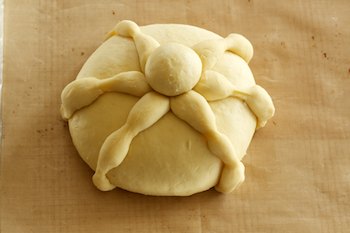
- Arrange three long bones across the top of each loaf, crossing them at the center and tucking the ends slightly under the loaf. Make an indentation in the center where the bones cross, and place the skull there.

- Make an egg wash by beating a whole egg with a splash of water and a pinch of salt. Brush a light, even wash on each loaf. Reserve the remaining wash.
- Slip the baking sheet(s) into a large plastic bag and proof until the loaves spring back very slowly when pressed (with a lightly moistened finger, to avoid sticking). This took about 3 hours for me.
- In the meantime, preheat the oven to 375F, with the rack in the center.
- When the loaves are fully proofed, brush them lightly with another coat of egg wash. Let them stand for 5 minutes before baking.
- Turn the oven down to 350F. Bake until the crust is a deep, glossy brown, about 45 minutes. If you use an instant-read thermometer, the internal temperature should be at least 185F.
- Turn off the oven and crack the door open. Leave the bread inside for another 5 minutes.
- Transfer the loaves to a wire rack. While they are still warm, brush them with clarified butter and sift sugar over them.
- Let the loaves cool completely before cutting.
Looks great! How much fresh yeast should I use? Because I like to use fresh instead of dried 🙂 thx!!
Shanna, here’s a conversion table: http://www.wildyeastblog.com/2008/01/12/let-us-now-praise-instant-yeast/
Beautiful bread, Susan! Do you know my Pan de Muerto?
Beautiful tribute to your loved ones! I simply MUST try my hand at this lovely item. Thanks so much for sharing it with us.
I have to admit, I was clueless, until your post, at the meaning behind this bread. Thanks for educating me.
Hugs to you, Susan!
Looks delicious and great family photos!
Fabulous! So nice to see you post again, Susan.
Hi Susan,
I love reading your blog, and am very happy that you’re doing what you do… teaching people to cook with healthy ingredients is so important in fostering a healthy life and more importantly a healthy future. Today I am contacting you because I too am trying to do my part in getting people to eat and live healthier. In 2008 I set on a quest to look for the ideal cooking pot, one that would give me all the nutrients from the food being cooked without adding its own ingredients or contaminants. It was a personal happening that led me to do this and all my research pointed out in one direction — Pure Clay. After several years of research and travel I set out to make my line of pure clay cooking pots and their made in the USA. I had benefited so much from cooking in these pots that I had to share it with the world.
We choose to keep our raw material pure because the health benefits are overwhelming this way and greatly surpass that of cookware made from other kinds of manufactured clay like ceramic etc. I have come to read and love your blog greatly and would like you to consider taking part in our Affiliate Program so we can together promote this extremely healthy way of cooking to all your readers. You can find all the information about our cookware at miriamsearthencookware dot com or PureClayCookware dot com and sign up for the affiliate program by clicking on the affiliate tab on top.
And oh by the way we’re giving out pots to those who sign up early and the list is quickly filling up, I really hope you can be a part of it. We need your help in bringing back to life this beautiful, healthy, extremely eco-friendly method of cooking, it goes so well with your theme of helping people eat healthy, so do consider joining us.
Good luck with your blog.
Miriam Kattumuri
Wow – amazing! Thank you so much for sharing the history, pictures, and recipe of this bread!
Loved your sharing of family. Points out the seeming small things that people do that have huge impacts on ones life.
In reading your mixing instructions I have a question. I know butter impedes gluten development but I have never read that sugar does the same thing. My understanding has been that high sugar content slows down fermentation because it uses water thus competes with the yeast who also need water to grow and reproduce. Can you please explain its affect on gluten development?
Thanks!
Janet
Janet, I have seen a couple of different explanations for why sugar impedes gluten development. One is that, as you noted with fermentation, the osmotic pressure of the sugar draws water away, and the proteins glutenin and gliadin have difficulty organizing into a network (gluten) without sufficient water. The other explanation is that sugar combines with each of these proteins and keeps them from combining with each other, again impeding formation of the gluten network. I’m not a chemist so I don’t know which of these explanations is correct (and maybe both are to some extent), but I do know from experience that for high-sugar doughs, adding the sugar gradually is much more efficient than dumping it all in at the beginning!
Thanks for the comment. I know from experience too, when baking holiday loaves, that the formulas always suggest adding the sugar in stages but they do not explain the reason why. Your 2 reasons make sense.
I wonder if that is the case with using honey or agave since they are liquid rather than in dry/crystal form???
I will do some experimenting this holiday season and see if I can notice a difference in the mixing times too.
Always something new to learn 🙂
Janet
Hi Susan,
What a nice post with family photos and a beautiful bread. I’m happy to see you post again.
wow..looks mouthwatering…THis is what happens when you mix cooking and art together:)
Why do you need the extra yeast if it’s sourdough? What would you expect the results to be without the added yeast?
Hello to all, the contents existing at this web page are actually
amazing for people knowledge, well, keep up the nice work fellows.
You should try it