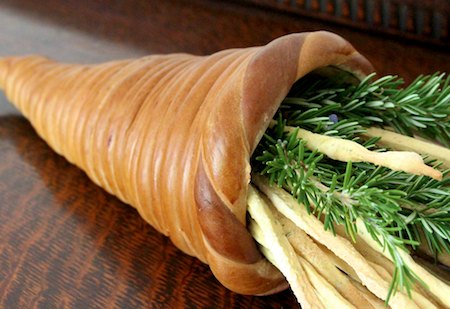
 This month it was my turn to lead the Bread Baking Babes into battle, and I wanted to do something to celebrate Thanksgiving, the holiday that many Americans consider our most important. I’ve also been wanting to experiment with dough sculpture, so I asked the Babes to make a cornucopia, a symbol of bountiful harvest and giving thanks, from slightly-yeasted decorative dough.
The light and dark dough recipes are adapted from Jeffrey Hamelman’s excellent book, Bread: A Baker’s Book of Techniques and Recipes. Hamelman also gives instructions for creating a woven version of the cornucopia, but I opted for a simpler rope-winding method. Some of the other Babes chose to weave, and the results are spectacular.
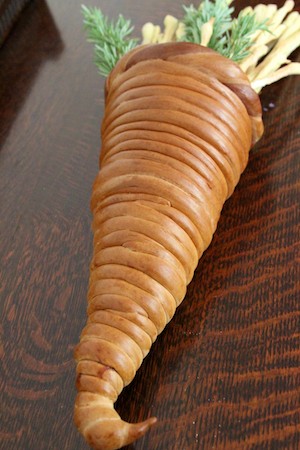
If you are in a winding-or-weaving, thanks-giving frame of mind, please join the cornucopia-fest and be a Bread Baking Buddy. Send me the link to your cornucopia by November 29 to be included in the Buddy roundup. (And in case you are a cornucopia curmudgeon like this humorous guy, you could also choose to make make another type of vessel with the dough.)
As you can see, I made quite a few of these horns in my quest to be a good Babe and come up with instructions that work. Be assured, therefore, that when I say, “Spray the cone with baking spray or oil so it does not stick to the dough,” or, “A countertop oven does not work well, even for a small cornucopia, because it is too close to the top element and will burn,” I know whereof I speak.
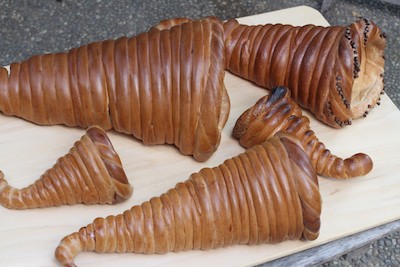
I have included recipes for both light and dark dough. I used the dark dough only on the rim of a couple of the cornucopias (cornucopiae?), and I let them brown for a little too long to allow the contrast between light and dark to be very noticeable. I also tried sticking whole cloves into one; they popped out initially but after about a half-hour of baking allowed themselves to be pushed back in and stayed there.
You can make this any size, just be sure it will fit in your oven. I found that a nice size (the two medium-sized ones in the photo, top right and bottom center) was made with a cone rolled from a 14 x 11-inch piece of poster board and ended up being 12 inches long (excluding the wagging tail) with a mouth diameter of 4 inches. This size requires about 900 g of dough. The smaller ones are 6 inches long and require about 300 g.
There is no fermentation or proofing time for the dough, and once I figured out how to do it, they assembled very quickly. However, the baking time is quite long, because you need to make sure the dough is really dried out so the piece will last without molding. So in case you were thinking of whipping one of these up on Thanksgiving morning, you may want to revise that plan.
Because it’s a “horn of plenty” and not a “horn of nothing,” a cornucopia ought to be filled. The possibilities are many — fruits and vegetables, dried flowers and grasses, small animals, etc. all come to mind. If you want grissini like I have in mine, I have some suggestions.
The other Babes offer more inspiration: Astrid (Paulchens Foodblog), Lien (Notitie van Lien), Görel (Grain Doe), Elizabeth (blog from OUR kitchen), Tanna (My Kitchen in Half Cups), Natashya (Livingin the Kitchen with Puppies), Sara (I Like to Cook), Ilva (Lucullian Delights), Karen (Bake My Day), Elle (Feeding my Enthusiasms).
And now, the step-by-step guide to cornucopia construction:
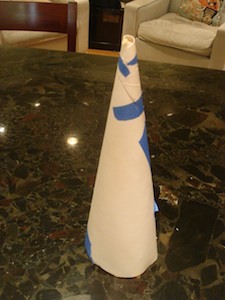
- Before mixing the dough, prepare your form. Roll a rectangle of poster board or other light but sturdy cardboard into a cone, securing it with tape. Trim it so the mouth is even and it more or less stands up straight (a little off-kilter is fine).
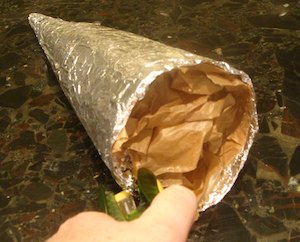
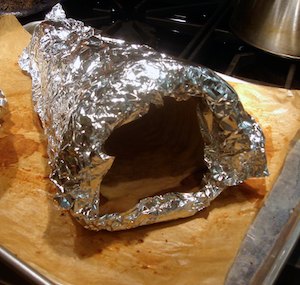
- Cover the cone with foil. (The foil is optional, but it helps the form release more easily from the baked dough.) Stuff the form with crumpled foil or paper to help it maintain its shape. Foil is firmer. To keep the stuffing from falling out, I stapled a piece of parchment paper across the mouth.
- Spray the form with baking spray or oil. Stand it up on a parchment-lined baking sheet.
- Now mix the dough(s); the recipes are below. I suggest refrigerating it immediately, removing small pieces to work with as you need them.
- Preheat the oven to 360F (180C).
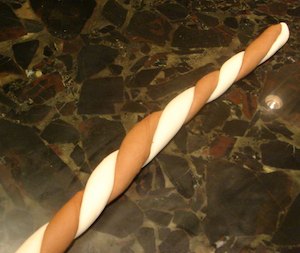
- To form the rim, roll two strands of dough and twist them together like rope. For my 12-inch cornucopia, each strand was 1/2 to 3/4 inch in diameter.
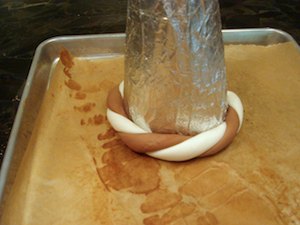
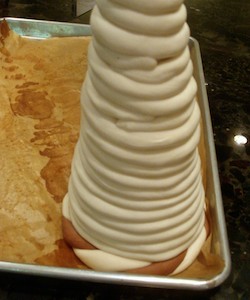
- Wrap the rope around the bottom of the upright form overlapping the ends and pressing them together slightly.
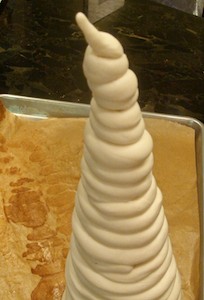
- Roll another strand of dough, again 1/2 to 3/4 inch, tapering the ends. Coil it continuously around the form until you run out. Then repeat with more pieces, overlapping the tapered ends slightly. I didn’t worry about making all of the joins in the back, as I think the overlaps add to the rustic appeal of the piece. Make sure each tier lies on top of the one underneath it with no gaps (although small gaps are okay; they will fill in as the dough expands a little during baking).
- When you get to the top of the cone, continue the coil just a bit further and curve it a little to form the tail.
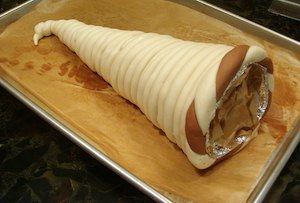
- Carefully lay the cornucopia down on the baking sheet so that the rim seam is on the underside.
- Make an egg wash by lightly beating together one whole egg, a splash of water, and a pinch of salt. Brush the cornucopia lightly and evenly with the egg wash, reaching as far to the underside as you can without lifting it up.
- Bake initially for 30 – 45 minutes. This should set the dough enough to hold its shape when the form is removed. Removing the form helps the inside dry out much faster. Tongs are helpful if you can’t grab it well. At this point, or any further point in the baking, if the cornucopia has reached the color you want it, cover it with foil , leaving the mouth open.
- Return it to the oven to bake for another 30 – 45 minutes. Then turn off the oven, leave door slightly ajar, and let the cornucopia stay in there until it is quite dry inside, another hour or two. If your oven cools down very quickly, you may need to leave it turned on at a low temperature instead of turning it off completely. The exact baking/drying time will depend on the size of your piece.

Light Yeasted Decorative Dough
(Adapted from Bread, A Baker’s Book of Techniques and Recipes, by Jeffrey Hamelman.)
Yield: 1500 g (more than enough for one 12-inch and one 6-inch cornucopia)
Ingredients:
- 875 g flour
- 481 g water
- 3.5 g (1-1/8 t.) instant yeast
- 13 g (2-1/3 t.) salt
- 44 g milk powder
- 39 g sugar
- 44 g butter, softened
Method:
- In the bowl of a stand mixer with dough hook, or a medium mixing bowl, combine all ingredients.
- Mix on low mixer speed, or by hand, until all the ingredients are evenly incorporated.
- Continue mixing on medium speed, or by hand, until the gluten is very well-developed.
- Use the dough immediately, working with small portions at a time and keeping the remainder of the dough refrigerated.
Dark Yeasted Decorative Dough
(Adapted from Bread, A Baker’s Book of Techniques and Recipes, by Jeffrey Hamelman.)
Feel free to scale this down, since you’ll only need a small amount if using it as an accent. However, small amounts may be difficult to mix effectively in a stand mixer.
Yield: 500 g
Ingredients:
- 276 g flour
- 15 g sifted cocoa powder
- 162 g water
- 1.2 g (generous 1/3 t.) instant yeast
- 4 g (2/3 t.) salt
- 15 g milk powder
- 13 g sugar
- 15 g butter, softened
The method is the same as for the light dough above.
This is sooooo pretty!!
Wow, those horns are so beautiful!
Cheers,
Rosa
So cute!! I need to fix some pics and will post shortly after that! Thanks for this task Susan, I thoroughly enjoyed it (and hope it’s dry enough to enjoy the cornucopia for a long time)
While I am generally curmudgeonly about cornucopia, I am completely in favor of this particular one!
Thanks for the compliment and link!
This is so cool and inspiring, and I really should have been doing this by now, but time hasn’t been of my side lately. I will have to be a buddy, but I’m making this, I most certainly am! Thank you for this great challenge!
The posts you share are always a delight!
Thanks so much! Cheers….
Thanks Susan, this was an unexpected but real fun recipe to try! I love they way your Cornucopia is such a beautiful golden colour and round shape!!
Susan, I promise I will do this as soon as I am home in my Dallas kitchen! I’m so sorry I’m so far behind with our breads;( bread baking withdrawal really is unhappy.
You are a beautiful Bread Babe!
This is on my Thanksgiving baking to do list. I had so much fun braiding with Hamelman’s challah I thought I would try this. Way to go babes!
That is absolutely beautiful!
They are very pretty !
Wow! They look absolutely amazing!! Goodness!!
P.S. So, only women are allowed in this baking group? I noticed it is called “Baking BABES”. Just wondering…
Incredible! This looks like it will be lots of fun to make.
Thanks so much for such a fun challenge, very creative!
Susan! That is absolutely stunning. Your baking never ceases to amaze me.
This is great! I have never attempted to make one, because my son made one is school, in third grade. My son is now 20 years older!!! The cornucopia has survived 2 moves and is still in perfect condition. I just wrap it and put it in a box after T-giving each year. One of my favorite decorations.
That looks great, Susan!
That is beautiful!!!!
with love and cupcakes,
Cookteen
Susan this was fun to try! Thanks for picking it.
Great challenge Susan! Who knew that making dough ropes could be such fun 🙂 XO Elle
I can’t get over how beautiful your cornucopia is! Mine was a little more rustic….
And what a fun task it was, Susan!
I will be posting about my adventure soon (I’m hoping that it might still be 16 October in some part of the universe when I do). There are still a couple of photos that have to come out of the camera.
What a gorgeous way to display festive decorations and/or food!
Very nice article. Thank you.
so cool
This looks so easy, what a great recipe.
New to your site, I love all the recipes and those Cherry pine nut scones look so good.
I love this! May have to give it a try for Thanksgiving!!
This is so ridiculously awesome. Inspires me to get over my bread fears, perhaps.
What a wonderful idea for Thanksgiving… It’s beautiful!
I have made these twice and it certainly gets easier each time. Had trouble with the first batch with the ends breaking off. Hope the second one will be stronger. They are beautiful!
Your horns are very creative…awesome..:P..i have no words..WOW!
Those horns really are beautiful, I wish I had had time to bake along for Thanksgiving. Too much on my table this year, but I’m thinking they would look pretty with redwood boughs and holly berries on the Christmas table… 😉
Wow! These horns looks absolutely amazing..
Amazing and fabulous!
These are lovely, Susan! Bookmarked. I am sure my son is going to love this one!
I like what you guys are usually up to at http://www.wildyeastblog.com/2010/11/16/cornucopia. This sort of clever work and exposure! I wish I could put in more effort. Keep up the awesome works guys I’ve added you guys to my personal blogroll.
that cornocupia is so beautiful will be on my kitchen table this year,i did made easter basket from dough but i would never know you can make cornocupia until i saw this picture,thanks very much,,,jola