If you’re moving across the country and want to take your sourdough starter with you, or want to mail some to a friend, or want to save a backup of a particularly well-loved starter as insurance against accidental loss, drying your starter can be the way to go.
Drying a liquid starter is simple and fast, and reviving it to baking strength takes less time, and is easier, than starting a new one from scratch.
Before drying your starter, make sure it is strong and vibrant. If you normally refrigerate it, take it out and feed it for a few days, as you would before using it in a dough.
When it is good and strong, feed it a final time, then ferment it for about half the time you would normally go until the next feeding. You want the yeast to have something left to feed on while they are falling asleep.
Then, using an offset spatula, spread a thin layer of starter on a piece of parchment, put it somewhere where it will be free from flying debris, and wait for it to dry completely. This will take approximately overnight, but the exact time will vary according to the hydration of your starter, how thickly your smear it, and the temperature and humidity in your house. Make sure it is completely bone dry, or you run the risk of mold.
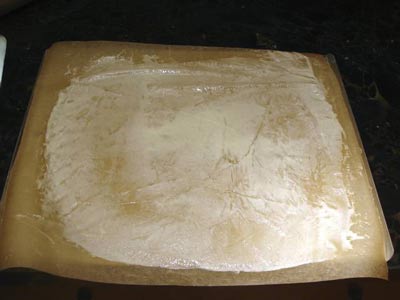
Here’s how mine looked just after spreading it out to dry:

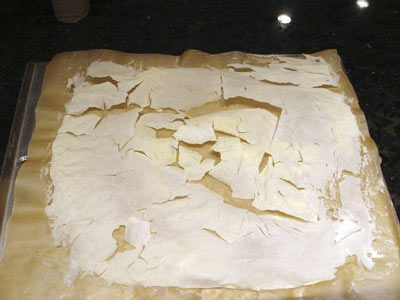
Here’s how it looked after drying for 2 hours:
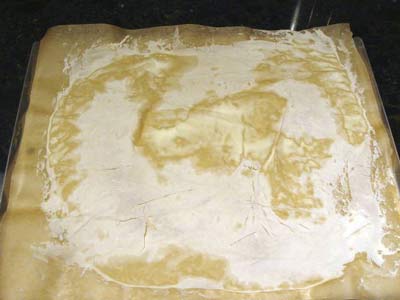
And here it is, completely dry after 12 hours:

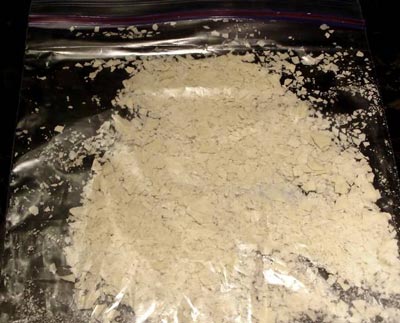
Now just put the pieces in a sealed bag and use a rolling pin to crush them to the approximate size of fish food flakes, or smaller, like this:

Store it in the refrigerator until you need it. I’m not sure how long it will keep, but I have successfully resuscitated one that had been chilling out for at least a year.
To revive the starter, the general idea is that you just start feeding it with flour and water, in the same ratio as the original. Here’s the schedule I used; your mileage may vary:
To 3/4 teaspoon (about 2.5 g) of dried starter, add 20 g water; soak for 10 minutes.
Add 20 g flour; cover and ferment for 24 hours, until there are small bubbles indicating life. (The bubbles will be within and not necessarily on the surface; using a clear glass or plastic container helps you see them.)
Without discarding any of the above, add another 20 g flour and 20 g water; ferment for 12 hours and see bubbles on the surface.
Discard all but 15 g of the starter, and add 30 g water and 30 g flour. Ferment 12 hours.
Discard all but 15 g of the starter, and add 30 g water and 30 g flour. Ferment 12 hours.
Discard all but 10 g of the starter, and add 40 g water and 40 g flour. Ferment 12 hours.
At this point, at 72 hours, my starter was active and ready to use.

The things I learn from you!
Damn I could have used this advice this three weeks ago! Although I’m not sure how customs would have liked 5 bags of dried sourdough starter! 🙂
Anyway, saying hi from TN (where I’ll be for the next couple of months). Got one rye starter ready and one wheat on the way. Flour is very different here to the UK – it’s going to be a learning curve!
Cheers,
FP
what a useful post! thank you
Joanna
Your clear information is so welcome! My starter is living in the kitchen for one year now and I was wondering how to keep it alive during my two weeks off. There is one portion frozen in case of accidental loss but I’d also like to dry some of the starter.
My question of how to send a starter by mail has also been answered. Thanks!
Great post!
I knew you could simply dry your starter, but knowing and actually seeing the images are two different things entirely.
Thanks a ton!
So useful Susan, I always learn something when I stop by here 🙂
To think I actually bought some dried started a couple of weeks back, I should have just done this!
WOW, Thank you so much for this post. I just found out we are moving from ATL to Seattle. I have only been keeping a starter since March and was wondering how I was going to keep it alive for over 2 weeks while moving. I love your site. You are a great baker and writer. Thanks so much for all you do!
Great step by step photos – the instructions are so clearly written out as well. Thank you! (From a compulsive, archiving-obsessed baker 🙂 )
Marjoke, for just two weeks, consider storing your starter in the refrigerator instead of drying it. Mine has survived a two-week chill without incident. I would dry mine if it were going to be more than, say, a month.
LOL!! I also could have used this post a few weeks ago too.
My best friend decided she needed a bit ‘o Herbert. She talked me into packing it in my suitcase for an airplane trip from California to Portland Ore. I put a half cup of liquid starter into a sealed plastic rubbermade container and packed it with an ice pack.
I sat there shaking with nervousness as the guy next to me at the airport got pulled aside for having an ounce silicon oil in his suitcase. Needless to say, my BF is baking with her starter now. :0)
Who knew you could dry them? You are such a font of information. 🙂
I learn so much from your blog – it’s my “go to” site for yeast info. Thanks so much for this post.
This is such an interesting post Susan, thanks so much. I’ve made a print and try to dry a portion of my start “Gollem”, who lives in my fridge but get no regular feeds (he doesn’t seem to mind), but as I grew attached to him, I’d better take some security measurements 🙂
I sure wish I would have taken out some insurance on my starter. I’d managed to keep it alive for a year, then went out of the country for 6 weeks – my husband was supposed to feed it, but didn’t, and it didn’t make it. I still haven’t started a new one…but I need to!
Is there any reason this would not work with rye starter? I discovered your excellent site looking for an apple cider rye bread, and now I’m building the rye starter a la Nancy Silverton. I know I could always begin with white starter again, but I haven’t entirely gotten over the throwing a bunch of starter away problem.
Catherine, I have not done this with a rye starter but I think it would work. If you do it, let us know if it does!
I am very new to sourdough baking and having literally been reading up on it for weeks on the internet, and while I had heard of dried starters had no idea till now how to produce one myself – thanks so much.
I’ve had such fun learning to make my starter. I’ve made the ciabatta and some plain bread with great success too. Now I’m going to dry some starter for while we’re away on holiday. I already froze some to test if it’ll work too.
Fabulous site!
I was wondering the exact method of drying. I have 3 big containers of starter dormant in my fridge (I hate to throw any of it away when I’m feeding my main starter) that I use as give aways, back up, etc. Now I can dry most of it, although I think with all that I have, it will take a while.