
Like desserts, pastries are not something I bake often. We eat crusty hearth breads around the clock, including for breakfast. But for some reason, the BreadBakingDay #10 theme of Breakfast Breads, hosted this month by talented baker Melissa (Baking a Sweet Life), put me in mind of Danish pastry. The flakier the better.
I intended to make a traditional laminated dough (many discrete layers of dough and butter). I don’t have a lot of experience with this, and definitely need to practice. Keeping the dough cold so the butter does not melt into it during the rolling and folding process is critical, and it takes the better part of a day because the dough has to be thoroughly re-chilled between roll-and-folds. So I set aside a day to work on this.
As it turned out, the weather on the designated day was uncooperative. A heat wave plus an un-air-conditioned kitchen do not create ideal conditions for laminating dough, and I chickened out wisely decided not to set myself up for failure. However, just as I convinced myself that I didn’t really want Danish after all, I serendipitously tuned in to the latest episode of the wonderful 1990’s series “Baking With Julia” [Child], which my PBS station has been airing lately.
Lo and behold, there was Scandinavian baking maven Beatrice Ojakangas, teaching Julia how to make Danish dough with a technique that achieves flakiness without traditional lamination.
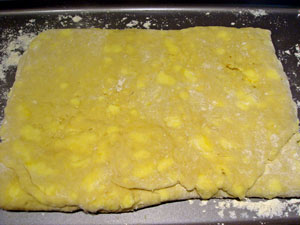
The trick is to mix rather large chunks of butter directly into the dough. Although the dough and butter are maintained as distinct layers, the dough is still rolled and folded several times. This can be done all at once (or, if the dough warms up too much, as in my case, with a short chill between steps as needed). According to the series’ companion cookbook, Baking With Julia by Dorie Greenspan, “this is the way it’s done these days all over Denmark, where they know great Danish when they taste it.”
Another interesting thing about this dough is that the mixing is extremely minimal, to avoid destroying the butter chunks. Therefore, any gluten development derives only from the rolling and folding.
I must say I didn’t like this quite as much as properly laminated pastry. It was just not as crisp and flaky. I’m sure I would have done better on a cooler day, and if I were just more skilled at this, period. But I do think the minimal gluten development, as well as lack of true dough-butter-dough-(etc.) layers, played a role. Even so, these were fun to make and delicious to eat.

The entire “Baking With Julia” episode can be viewed on videos at the PBS website, and the recipe is also in the book. Once the dough was made, my method diverged from Ojakangas’; she encloses filling within the pastries, whereas I like mine on the outside. Also, I refrigerated my shaped pastries overnight so I could bake them fresh in the morning. I had to get up early, though, as this requires a 1.5-hour-or-so proof. According to the original recipe, immediately after shaping you can proof for 30 minutes, then fill and bake.
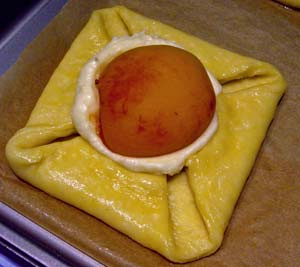
The cream cheese and almond fillings are adapted from ones I learned in SFBI’s Viennoiserie course. The almond one is butter-based and melts quite a bit during baking (see the lower right pastry in the top photo). The cream cheese filling is better at maintaining its definition. Stone fruits and berries work very well with these fillings. You could use canned or frozen fruit, but nothing beats fresh.
Thanks to Melissa for an excellent theme this month. Check her blog in early June to see the BBD roundup of what’s sure to be a brilliant collection of breakfast breads. And thanks, as always, to Zorra for being the grand keeper of BBD.
*****
Fresh Fruit Danish
Yield: 16 pastries
Time (once dough and fillings have been prepared):
- Roll, cut, and shape: 30 minutes
- Refrigerate: overnight (if you want morning pastries)
- Proof: 1.5 – 2 hours (30 minutes if the dough has not been refrigerated)
- Fill: 10 minutes
- Bake: 10 – 13 minutes
Ingredients:
- One recipe well-chilled pastry dough (recipe follows)
- About one cup almond and/or cream cheese filling, at room temperature (recipes follow)
- Fresh fruit of your choice: pitted cherries, blueberries, strawberries, apricot halves, etc.
- One egg, lightly beaten (or egg left over from making cream cheese filling)
Method
- Cut the dough in half to make two rectangles. While working with the first half, keep the second one chilled.
- Roll one piece of dough into a 20 x 10-inch rectangle.
- Trim the rectangle just enough to give it cleanly-cut edges. Cut the dough into eight pieces, each 5 inches square. I used a pizza cutter for this. If using a knife, cut straight down on the dough. Do not drag the knife through the dough; this makes the layers stick together.
- Shape each piece as desired (see below) and place on a parchment-lined baking sheet. Depending on how you shape, you will need two or three baking sheets to accommodate all 16 pastries.
- Brush lightly with egg. Try to avoid washing the cut edges of the dough, as this tends to glue them together. Reserve the extra egg.
- Repeat with the other half of the dough. Cover with plastic wrap or slip into a large bag, and refrigerate overnight.
- In the morning, remove the pastries from the refrigerator and let them proof, still covered, for about 1.5 – 2 hours, until they feel light and puffy.
- Meanwhile, space two racks evenly in the oven and preheat on the convection setting to 375F. (If you don’t have convection, preheat to 400F. You may have to rotate the baking sheets halfway through baking.)
- Brush the pastries again with egg.
- With wet fingers, make a depression in the center of each pastry. Fill with about one tablespoon of filling, and press fruit of your choice into the filling. If using multiple pieces of fruit, crowd them as closely as possible; they will spread during baking.
- Bake for 10 – 13 minutes, until the pastry is flaky and golden brown.
*****
(adapted from recipe by Beatrice Ojakangas on “Baking With Julia”)
Yield: 16 pastries
Time:
- Bring milk and egg to room temperature: about 30 minutes
- Mix and chill: 8 hours to 4 days
- Roll and fold: 20 minutes (longer if dough warms and needs to be re-chilled between folds)
- Chill: 30 minutes to 4 days
Ingredients:
- 57 g warm water (110F)
- 120 g milk, at room temperature
- 50 g (one large) egg, at room temperature
- 5.8 g (generous 1-3/4 t.) instant yeast (original recipe calls for 2.5 t. active dry)
- 50 g sugar
- 6 g (1 t.) salt
- 330 g all-purpose flour
- 226 g cold unsalted butter
Method:
- In a large bowl, whisk together the water and yeast. Let stand for a minute, then whisk in milk, egg, sugar, and salt.
- Place the flour in the bowl of a food processor. Cut the cold butter into 1/4-inch slices and add to the flour. Pulse the processor briefly about 10 times, until the butter is cut into pieces of approximately 1/2-inch diameter. Don’t overprocess!
- Add the flour and butter mixture to the wet ingredients. Fold with a rubber spatula until the liquid ingredients are just barely incorporated. The dough will be very rough and chunky with butter.
- Cover the bowl and chill the dough for at least 8 hours and up to 4 days.
- Turn the dough onto a floured surface; a cool stone or metal counter is best, if you have one. Sprinkle the dough lightly with flour and pat it into a roughly square shape. With a rolling pin, roll the dough into a 16-inch square. Fold it into thirds, letter-style
- Roll the dough into a 24-inch by 10-inch rectangle. Again fold the dough in thirds so you have a 8 x 10-inch rectangle. (At this point, my dough was getting a bit warm and flabby and so I wrapped it in plastic and returned it to the refrigerator for about 45 minutes.)
- Roll the dough into a 20-inch square and again fold in thirds.
- Roll the dough into a 24 x 10-inch rectangle. Fold into thirds to end up with an 8 x 10-inch rectangle.
- Wrap in plastic, and chill for at least 30 minutes, or up to 4 days.
*****
Yield: About 1-1/3 cups
Time: 5 minutes
Ingredients:
- 226 g cream cheese
- 113 g sugar
- 19 g butter, at room temperature
- 28 g flour
- 21 g egg, lightly beaten, at room temperature (This is a little less than half a large egg. Save the rest of the egg to wash the pastries.)
- 4.5 g (1 t.) vanilla extract
Method:
- Soften the cream cheese with a hand mixer on low speed.
- Add the butter and beat on medium speed until incorporated.
- Add the sugar in three portions, mixing well after each addition.
- Beat in the egg, then the vanilla.
- This can be made ahead and refrigerated for several days. Bring it to room temperature before using.
*****
Yield: About 1-1/2 cups
Time: 5 minutes
Ingredients:
- 112 g butter at room temperature
- 112 g sugar
- 112 g almond meal (or you can grind blanched almonds finely in a blender or food processor)
- 35 g flour
- 50 g (one large) egg, lightly beaten, at room temperature
- 3.4 g (3/4 t.) rum
Method:
- Blend flour and almond meal together.
- With a hand mixer, cream butter and sugar in a medium bowl.
- Add the egg little by little, mixing well after each addition.
- Beat on medium speed until light.
- Add the flour/almond meal mixture and mix until incorporated.
- Add the rum and mix well.
- This can be made ahead and refrigerated for several days. Bring it to room temperature before using.
*****
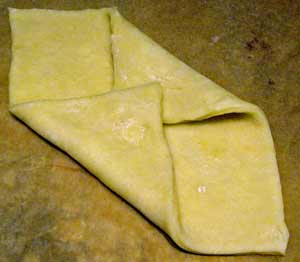
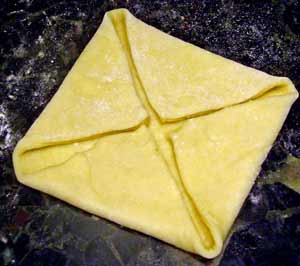
Each 5-inch square of dough makes one pastry. I made three different shapes:
The two-corner fold: fold two opposite corners in to meet in the center.
The four-corner fold: fold all four corners in to meet in the center. Leave a little space between the folded edges.
The pinwheel:
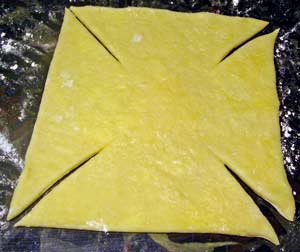
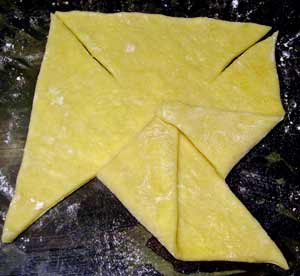
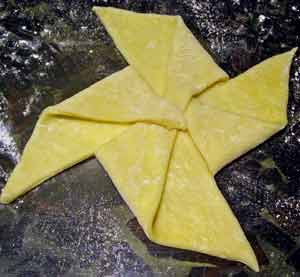
Use a dry pastry brush to lightly brush any excess flour from the dough after shaping.
*****

As always Susan – Thanks for the great step by step how tos! I’ve not done danish either – actually that list I haven’t done seems to always be getting longer, how is that.
Wish I had some of these in the fridge right now.
Such a shame you weren’t quite happy with the pastry but they looks absolutely stunning and so delicious.
Those look amazing.
love the process photos, i have always wanted to try to make laminated dough, i read the instructions over and over again thinking to myself it can’t be that hard (although i’m sure it really is). your beautiful pastries are encouraging!
I, too, am too afraid to make my own laminated dough. My current excuse is that I don’t have enough counter space to roll the dough out properly…
Your pastries look gorgeous and scrumptious.
Before seeing your Danishes, I’ve never really been a fan of these kind of pastries. But then I’ve never seen them made with real fruit. In spite of the fact that you aren’t completely pleased, I must say that they do look fabulous. 🙂
(It just doesn’t seem right that you are suffering with a heat wave and our temperatures are still well below normal. Why can’t we strike a compromise. Please send your extra degrees to us so everyone can be happy with the weather.)
Dang, the baked fruit with the cream cheese filling…what an awesome combination. I like the look of that almond filling too. And I love your shaping photos.
Oh and thanks for the link, what great videos.
Good lord you are killing me! I love Danish, though I have made them with Dieter Schorners fabulous recipe and one I got from a French bread book where the are called pate de coque, excellent and crispy layers!
Go girl, go!
Gorgeous! I too have been having weather issues… I was wanting to do sticky buns but I have the feeling I may chicken out as well from the weather and the state of my horrid rental kitchen and find something much easier. Alas. But yours are so beautiful they barely qualify as a chickening out, I must say.
Tanna, I hear you about that ever-growing list.
Helen, thanks. I was actually pretty satisfied but still think the laminated ones would be a tiny bit better.
Tracy, thank you!
mimi, I think it’s not hard so much as involved and time-consuming. Go for it!
Boaz, I can’t claim that excuse, mine is more time-related. I have to plan in advance because it’s so time consuming, and planning is not my strong suit. As for counter space, hmm, if you have a kitchen or dining room table perhaps you could use that, with something on it to protect the surface? You are very creative when it comes to bread baking so I’m sure you can come up with something 😉
Elizabeth, sorry, our heat wave is over so we have no degrees to spare at the moment, it’s just warm enough… Hope you warm up soon!
rainbowbrown, those videos are a real treasure, aren’t they? (As was Julia herself)
Jeremy, your beautiful Danish are one more reason I want to get the laminating thing down.
http://www.stirthepots.com/2007/10/bakers-dozen.html
Laura, I hope you do the sticky buns eventually — one of my favorites!
These are really beautiful. And as Tanna says, I have this evergrowing list of things I want to make!
Don’t know how I missed out on this event. You’ve really outdone yourself here. Your pastries are gorgeous and making me wish I’d had something other than bran flakes for breakfast. Beautiful!
Great post – I love the photos, and appreciate the review of the recipe. I’ve been eyeing Danish recipes lately. And I don’t think you chickened out – it’s what’s called being an experienced baker. I won’t make meringue any more when it’s humid!
I love Danish! Especially the creamy filling inside. What a great step by step recipe you’ve posted! Makes me hungry. I should give it a try some day.
wonderful post. i am planning on make breakfast bread for a big meeting tomorrow and have no idea what to make. This looks good, but I don’t know if I am ready to make 40 individual danishes tonight–though I have bookmarked this for later.
Words don’t exist to express my love for danishes. Although I sometimes make them, my friend Dean is usually the person who makes the Danishes I eat. His Thornhill, Ontario bakery (called Amadeus) daily makes the most delicicious light, flaky apple Danishes. Yum!
Don’t these look absolutely gorgeous. I think I have to try these out – a great weekend project – lovely.
Aparna, that’s the story of my life, too.
Kelly, it’s not too late — deadline for this BBD is June 1.
Madam Chow, very nice of you to let me off the hook!
Farida, I’m sure your Danish will be just lovely.
Maybelle’s mom, 40 Danish would be a lot of work. If you watch the videos you’ll see that Beatrice O. also makes this dough into a Danish braided loaf — not quite so much work in terms of individual shaping.
Dana, flaky apple Danish sound wonderful!
Giz, thanks!
Oh Susan this is just such a great post- beautiful pictures, clear explinations- A++
And a wonderful entry for BBD this month to boot!
Wonderful Danish! You should open a bakery.
Wow. You don’t know how hungry I am now for a good danish pastry. Marvelous post. (And, I don’t even have a sweet tooth).
Wonderful! I’m hoping to make these soon. On the cheese filling, you don’t say when to add the flour, but I gather from sequence in almond filling that you would add it last? Is that correct?
Don’t know if you’ll see this. As one who loves to bake but without a scale to measure ingredients I would so love a conversion to volume!
This is the best dang bread blog. Absolutely drool over the recipes! Thanks so much for inspiring me.
i would love to make this danish recipe, but I leave in a place really hot, about 28°C… do you think I can do it without problems of melting??
looks like a lot of work…
For the record – actual danish pastry, called “Wienerbrød” is NOTHING like this. I am born and raised en Denmark and have never, and I mean never seen any pastry look anything like this.
We do not bake fruite into our “danish” – maybe raisins, but that is about it. If you are ever in Denmark, you should try real danish pastry. I can asure you that is looks a 1000 times better than this, and I would imagine tastes better to.
http://b.bimg.dk/node-images/42/620×411-c/42117-dansk-wienerbrd-truet-af-muhammed-tegninger–.jpg
This is my first time visit at here and i am in fact happy to read everthing at one place.