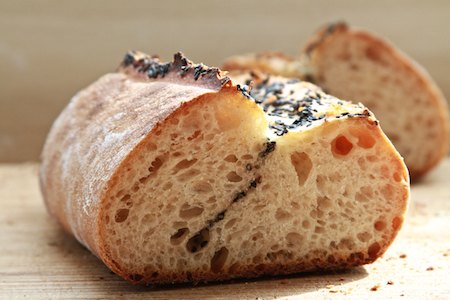
The inspiration for this seeded bread came from Pain de Beaucaire, which uses a unique shaping technique to create a rustic, bran-speckled fissure in the loaf with no slashing required. Here, the bran is replaced with black sesame seeds, for a nutty flavor and dramatic presentation. Sandwiched between two slurry-slathered layers of dough, the seeds cause the loaf to open down the middle.

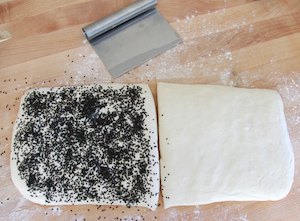
To form the loaves, I pressed the stiff dough into a rectangle, brushed it with a wet flour-and water slurry, and cut it in half. I sprinkled one half with seeds…

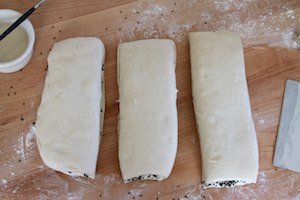
… and flipped the unseeded half onto the seeded half, sandwich the slurry and seeds in the middle. Using a dough cutter and cutting straight down (not dragging through the dough), I cut the sandwich into three smaller sandwiches.

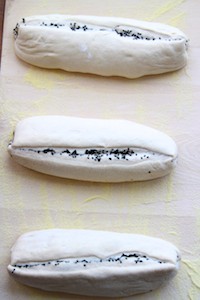
I proofed them in a couche, still in the horizontal position, but for baking I stood them up on their sides. In a few spots where the seams were stuck together, I gently separated them with my fingers.

If the dough is not stiff enough, the loaves will not stand up like this. Don’t worry that the dough is too dry, though; the steam created by the slurry helps to lighten the crumb for a softer loaf than you might expect.

Open Sesame
Yield: 1500 g (3 loaves)
Time:
- Mix: 10 minutes
- First fermentation : 3 hours with a fold at 1.5 hours
- Shape: 10 minutes
- Proof: 2.5 hours
- Bake: 40 minutes
Desired dough temperature: 77F
Dough Ingredients:
- 730 g flour
- 25 g whole wheat flour
- 402 g water
- 18.1 g (1 tablespoon) salt
- 325 g mature 100%-hydration sourdough starter
Slurry Ingredients:
- 10 g flour
- 50 g water
Filling Ingredient:
- about 15 g sesame seeds
Method:
- In a stand mixer with dough hook, combine all of the final dough ingredients, except about 10% of the water, in low speed. Adjust the water as needed to achieve a stiff dough consistency.
- Continue mixing in low or medium speed to a medium level of gluten development.
- Transfer the dough to a lightly oiled container. Cover and ferment at room temperature for 90 minutes.
- Turn the dough into a well-floured counter. Pat it into a rectangle 10 x 15 inches. Fold the dough in thirds, letter-style, brushing off excess flour as you fold. You should end up with a 5 x 10-inch rectangle of folded dough.
- Place the dough back into its container or onto a floured baking sheet, cover, and ferment for another 90 minutes.
- On a well-floured counter, pat or roll the dough into an 8 x 18-inch rectangle.
- Make a slurry by whisking together 10 g of flour and 50 g of water. Brush slurry generously over the surface of the dough. You will not need all of the slurry; only enough to moisten both halves thoroughly.
- Cut the dough in half so you have two 8 x 9-inch rectangles. Sprinkle one half evenly with sesame seeds.
- Flip the un-branned half of the dough over onto the bran-covered half to make a sandwich with the wet sides and the bran in the middle.
- With a dough cutter, cut the dough into three strips, each 3 x 8 inches.
- Place the loaves in a lightly-floured couche. Cover and proof at room temperature for 2.5 hours. (If your oven is not big enough to bake all the loaves at once, proof for one hour and 45 minutes at room temperature, then refrigerate the loaves for at least 90 minutes before baking. They can be baked directly out of the refrigerator.)
- Meanwhile, preheat the oven, with baking stone, to 475F. You will also need steam during the initial phase of baking, so prepare for this now.
- To bake, carefully turn the proofed loaves on their sides so the seam is facing up. Placing them on parchment paper helps get them in the oven without falling over.
- Once the loaves are in the oven, reduce the temperature to 450F. Bake for 8 minutes with steam, and another 20 minutes or so without steam, until the crust is a rich brown color. Then turn off the oven and leave the loaves in for another 10 minutes, with the door ajar.
- Cool on a wire rack.
Wow, what a neat shaping idea! The rolls/bread look very delicious, thanks Susan!
Deliciously looking and beautiful as always, Susan. Great idea. What a treasure you’ll find when you open these sesame doors.
Very nice. It’s also nice that you used black sesame seeds. I love the flavor of toasted sesame seeds.
I wonder how it would come out if you used nigella seeds?
It’s beautiful Susan! Creative and fun shaping!
Beautiful pain… Ever since your first post on Beaucaire…I have been fantasying about taking a road trip to the Village to see and taste the real McCoy…it is 3 1/2 hours for here…hummm…where else could i go to extend the trip…?
I can’t wait to try that shaping technique. A bit like Pane Altamura. By my reckoning the final dough is 58%; not THAT dry. Thanks for the idea.
What a great shaping method, I must try it soon – loved the way the bread splits in the middle in such a dramatic way!
thanks, Susan!
Gorgeous and enticing!!!
Susan, I always admire almost incredible perfection of your bread. Your bread is not excellent artisan bread, it is an artistic creation. Bravo!
Can’t wait to try this. thanks for another great recipe!
so many breads, so little time….. 😉
Another beautiful bread, Susan!
These loaves are so incredibly beautiful. I love the shaping and surely, I will be testing it soon. Thank you so much for sharing.
Panasonic SD YD250 Bread Maker
Sorry about the previous post…fingers went haywire.
Well, for starters, you guys are right…the bread looks good enough to be on a runway. I tried this recipe 3 times and couldn’t get it to look this good. I am currently trying to get it right with my bread maker to see if that helps.
Thanks for the post Susan.
webmaster of Panasonic SD YD250 Bread Maker
wow it turns our really nice.
I knew going in that my loaves wouldn’t come close to the beauty of yours, but even so…
Everything was fine until the slurry stage, so forgive this novice question: do we use the full amount of slurry? Because I did, and the dough went from workable to soft and wet. So soft and wet that the seams disappeared pretty much completely at the proofing stage, though I was able to find the seam on one loaf well enough to bake it seam-up.
I’m in a humid climate; should I have used less slurry to compensate for moisture in the air?
Millicent, sorry for the confusion. No, you do not need to use up the slurry; just use enough to thoroughly moisten both halves of the dough. I’ve updated the instructions to clarify this.
I have a lazy day planned around the house today and I am about to go and make these little gorgeous loaves. They look fantastic!
I’ve been baking with my levain since this summer and have been hesitant to branch out while I am learning more about the process. I must have been feeling confident this weekend as I tried this recipe without a scale. I winged it using my new bread knowledge. This recipe was fantastic! The bread was flavorful with great texture and chewy crust. And it LOOKS beautiful with the swirl of sesame seeds bursting from the seam. I can’t wait to make it again…maybe after I get a scale! Thank you for sharing your recipe and tips.
This looks amazing! I want to try it SOON but what is the 100% hydration sourdough starter?