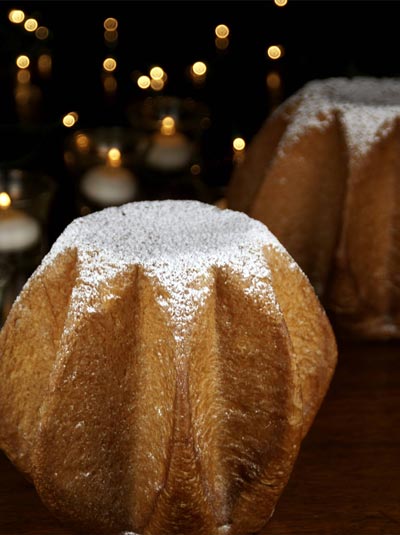
Let’s begin with the name: is it “pandoro” or “pan d’oro?” In The Italian Baker, Carol Field writes, “Although the name suggests pan d’oro (golden bread), pandoro is actually a dialect word for a Veronese dessert made more than two centuries ago.”
My own choice of appellation owes more to laziness than a commitment to historical accuracy. “Pandoro” is easier to type, and doesn’t require me to constantly edit after I’ve hit the semicolon key instead of the apostrophe. Let;s face it, I;m a slacker.
Whatever you call it, though, “golden bread” is definitely an apt description for this sweet, egg-and-butter-rich Italian holiday bread.
We made pandoro in class — sort of. Our instructor demonstrated the mixing process, we shaped the loaves and left them to proof overnight, and she baked them early the next morning. By the time I realized I needed to grab some while the grabbing was good, it wasn’t. So I was pretty much left with no choice but to make some for myself.
 Like its cousin panettone, pandoro is an involved bread. It requires a carefully-planned schedule, some ingredients and equipment you might not have on hand (but are readily available), and close attention during the final mixing process. That said, I would not discourage beginning bakers from attempting this. If you can follow directions and are in possession of a vigorous sourdough starter, you’re 90% there! I’d say if you have the fortitude to read this very hefty post, you have the fortitude to make pandoro.
Also like panettone, pandoro uses a sweet starter, which is developed from a “regular” sourdough starter over a period of at least two days. It must be kept in a warm place — 85F is ideal. I kept mine in the microwave with a bowl of hot water at home, and in the proofer (about 81F) at SFBI when I was there. It needs to be fed every four hours, so plan accordingly. You can sacrifice one feeding a day in the interest of a good night’s sleep; just don’t keep it quite so toasty for those eight hours. (I left mine overnight in the microwave without the hot water.) Use the starter in the first dough (see the recipe below) at the point in its routine when you would normally be feeding it (i.e., four hours after the last feeding). Instructions for building a sweet starter follow the pandoro recipe below.
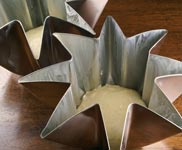
Pandoro is traditionally made in star-shaped molds. My Portuguese tin molds (left photo) are available through a number of internet sources. I like the Italian ones a bit better — they are heavier, taller, and the pleats are shallower — but I don’t know where to get them. Anyone with a hot tip about this will win the magic prize. But even if you don’t have pandoro pans, I wouldn’t be afraid to try any pans with tall sides, such as Bundt or angel food pans. Paper panettone molds would also work. The 500-gram loaf size and 35-minute bake times are right for a 2-quart pandoro pan.
Pandoro is rich with butter, sugar, and egg, which are natural enemies of gluten. In the mixing of the final dough, they must be added at the right time in order to mediate a peaceful settlement and coax the gluten into building the strength needed to carry all that richness.
The dough starts out quite firm, but don’t worry, it will loosen up as you add the eggs and the sugar. Just make sure you do so slowly — too fast and you’ll wind up with a soupy mess. If you do add things too fast, just keep on mixing and it will probably eventually come together, but plan on being an hour or so late for dinner. The butter is not added until the very end, once the gluten is completely developed. It took me about half an hour to mix my final dough.
Count on the final proof also taking a very very long time. The original recipe calls for a proofing time of about 14 hours at 72F. However, whose kitchen is 72 degrees in wintertime, especially overnight? Colder kitchen, longer proof.
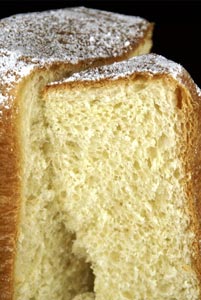
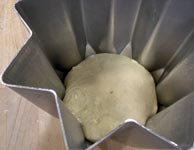
When fully proofed, the tops of the dough domes should be about level with the tops of the pans. You can see that mine weren’t. At 7 p.m., I started the loaves proofing in a large sealed plastic bag. When I got up at 6 the next morning, they had clearly moved, even in the 58-degree indoor overnight weather, but little enough that I knew they would not be close to ready by 9. I added a bowl of warm water to the bag. At 11 a.m. (we’re at 16 hours now) I put them in the oven on its 85-degree proof setting. By 1 p.m. (18 hours), they were still not there, but since I occasionally have a life outside of the kitchen, I needed to bake them anyway. Happily, they popped up quite nicely in the oven and when I cut into the cooled pandoro, the interior was feather-light, as it should be.
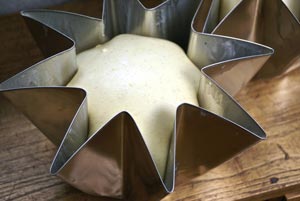

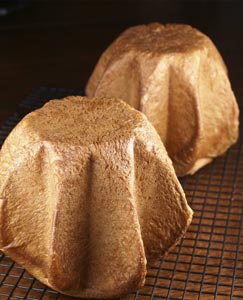 The pandoro should be removed from the pan while it is still warm, about 30 minutes out of the oven. The loaves are inverted so their domed tops squish down (yes, this is okay!) to become flat bottoms.
Finally, a few notes about some of the ingredients:
Cocoa butter: As I understand it, the purpose of this is to add some holes to the otherwise very regular crumb. Cocoa butter has a high melting point; pieces of it will not melt and incorporate into the dough during mixing and proofing. If you don’t have any, you can omit it altogether or use white chocolate. I found pure cocoa butter in the cosmetics section of Whole Foods; the label specifically said it was safe to eat. [Update: food-grade cocoa butter is also available online.]
Yeast: Osmotolerant dry yeast (SAF Gold) is a special strain of yeast that is not as bothered by sugar as regular yeast is. (In small amounts, sugar speeds up yeast activity, but impedes it in the high quantities we have here.) If you just can’t get osmotolerant yeast, try using regular instant yeast and increase the amount by about 30%.
Eggs: You will need a total of about five eggs along the way — first, second, third, and final doughs — but until you get to the final dough, the quantities are very small (less than one egg’s worth). I recommend beating the five together and storing them in the refrigerator, scaling out what you need from this reservoir at each step.
I am sending my pandoro to my friends Cinzia (CindyStar) and Zorra (1x umrühren bitte) for BreadBakingDay #25, Baking Under the Tree. Happy holidays!
Pandoro
(Adapted from SFBI)
Yield: 1000 g (2 loaves)
Time:
- Develop the sweet starter (assuming you start with a healthy sourdough starter): every 4 hours for 2 days, at 85F
- Mix and ferment first and second doughs (approximately simultaneously): 2 hours at 85F
- Mix and ferment third dough: 3 hours at 85F
- Mix final dough: 30 minutes or more
- Ferment final dough: 2 hours
- Proof in pans: 14 – 18 hours or more (see above notes) at room temperature
- Bake: 35 minutes
First Dough Ingredients:
- 66 g flour
- 33 g water
- 27 g egg
- 17 g sugar
- 96 g sweet starter (instructions follow), 4 hours after last feeding
Second Dough Ingredients:
- 41 g flour
- 0.8 g (1/4 t.) osmotolerant yeast (see note above)
- 27 g egg
- 8 g sugar
Third Dough Ingredients:
- 60 g flour
- 26 g egg
- 12 g sugar
- 3 g butter, softened
- all of the first dough
- all of the second dough
Final Dough Ingredients:
- 166 g butter, softened to pliability (not melted)
- 10 g cocoa butter, finely chopped (see note above)
- seeds scraped from 1/2 vanilla bean
- 219 g flour
- 5.3 g (7/8 t.) salt
- 10 g honey
- all of the third dough
- 166 g egg
- 106 g sugar
Additional Ingredients:
- melted butter, for brushing the pans
- powdered sugar for topping
Method:
- Mix all of the first dough ingredients together with your hand until they are evenly incorporated. Use a dough scraper to salvage excess dough left on your hand. Cover the dough and ferment in a warm place (about 85F) for two hours.
- Meanwhile, mix the second dough in the same manner and ferment it for 1.5 hours at 85F. Time things so the first and second doughs finish fermenting at the same time.
- When the first and second doughs are ready, mix the third dough, again by hand just until the ingredients are incorporated. Ferment it for 3 hours at 85F.
- Before mixing the final dough, beat the butter with the vanilla seeds in a stand mixer with a paddle until it is light. Add the chopped cocoa butter and stir it in briefly.
- In a stand mixer with a dough hook, combine the final dough flour, salt, honey, third dough, and half the egg. Mix on slow speed until the ingredients are incorporated, about 4 or 5 minutes. The dough will be stiff.
- Add a third of the sugar and continue mixing on slow speed until it is incorporated into the dough.
- Turn the mixer to medium speed and continue mixing for a few minutes to start to develop the gluten.
- Add about 1/4 of the remaining egg. Continue mixing in medium speed until it is completely mixed into the dough and a minute or so longer.
- Add about 1/4 of the remaining sugar and continue mixing until fully incorporated and another minute longer.
- Repeat the above two steps until all of the egg and sugar have been added.
- Continue mixing in medium speed until gluten has reached full development.
- Turn the mixer back to low speed and add the prepared butter mixture all at once. Continue on low speed until the butter is completely mixed into the dough and you can see the dough pulling away from the bottom of the bowl.
- Transfer the dough to a lightly buttered container. Cover and ferment for 2 hours, with a fold after the first hour.
- Meanwhile, brush your pans well with melted butter. Make sure you cover all the nooks and crannies of the pans.
- Turn the fermented dough onto a lightly buttered counter. Divide it into two pieces of 500 g each.
- Shape the dough into tight balls and place them, seam-side-down, into the buttered pans.
- Proof, covered, for 14 – 18 hours or more (see notes above), until the top of the dough dome is at the level of the top of the pan.
- Meanwhile, preheat the oven to 325F on convection setting or 350F on regular bake. You will also need steam during the initial phase of baking, so prepare for this now.
- Bake for 5 minutes with steam, and another 30 minutes or so without steam. The loaves should be a rich golden brown and their internal temperature should be 185F.
- Cool in the pans for 30 minutes, then invert on a wire rack and cool completely.
- Sift powdered sugar on the tops of the loaves before serving.
Note: These instructions assume you are starting with a vigorous “regular” sourdough starter. If you don’t have a starter yet, here’s how to start one.
- If you are starting with a stiff (50%-hydration) starter, skip to step 2. If starting with a liquid (100%-hydration) starter, convert it to 50% by combining 40 g starter with 20 g flour. Ferment for 4 hours at 85F.
- For each subsequent feeding (except the final one), discard all but 28 g starter, and add 20 g flour and 10 g water. Ferment for 4 hours at 85F. Repeat for about 2 days.
- For the final feeding (4 hours before you will use it in the first dough), combine 56 g starter, 40 g flour, and 20 g water. Ferment at 85F. You will need 96 g for the first dough.
Very awesome Susan, but I haven’t even time for a decent loaf, save for Graham’s roasted pumpkin loaf I made late Sunday, my wife is plowing through it!
Have a great Holiday and enjoy baking as much as I do!
Cheers,
Jeremy
Perfect! I love pandoro. You have inspired me!
xx
Excellent post and thank you for the detailed recipe. I have never heard of Pandoro, but am very familiar with Panettone. I will try it soon!
A superb speciality! Great recipe!
Cheers,
Rosa
It looks beautiful! The name must have started as pan d’oro because it means bread of gold, but the way we Italians write it or pronounce it is pandoro. When we say it we say in one word, if it were two words, we would slightly pause after pan. So pandoro it is.
I just love the shape of these, no idea how to slice or divide them but who cares, they’re just adorable.
I love pandoro! I made some last year with yeast, but your sweet starter version sounds great. How do you treat the sweet starter during night?
I’ve seen pandoro once or twice back in Brazil, but never tried it – silly me!
Amazing shape indeed – although I agree with baking soda, it would be tricky to slice it 🙂
I love Pandoro. Thanks for such a detailed description. I hadn’t realized until about a week ago (while reading in the Bread Baker’s Apprentice) that, as you say, sweet doughs inhibit yeast growth. That explains why my brioches used to rise so slowly (though since I’ve started using instant yeast, not such an issue). I’m trying to build a starter now for Pannetone out of BBA right now; it’s been stagnant so I added a shot of rye last night and am anxious to see if it finally sprung to life! I’m really hoping to bake some Chrismas Pannetone this weekend and the timing is getting tight…
Do you like the Carol Field Italilan baker’s book? I have her Celebrating Italy and love it, probably can credit part of my interest in bread to that…but not sure how much crossover there is between the two books.
Absolutely stunning! You are a bread baking goddess!
And I love those pans, they are going on my wishlist..
oh, susan, this is magic!
I feel ashamed … an Italian that never made pandoro either panettone! well, I tried pandoro once but, as you say, hurry is never a friend in the kitchen!…and obviously it was a failure!
anyway, I am enjoying yours at the moment, till I will try again!
thanks for participating with such a beauty, my best wishes for a joyful “goldbread” Christmas!
by the way, pandoro is Verona’s typical ‘Xmas cake, just where I live!
Beautiful pandoros.
Thanks for the detailed description.
I read your post more attentive and know the answer for my question now.
What a beautiful loaf! I love the shape of the molds.
I stand by my description of this as ‘crack bread’. Buttery, sweet and awesomely amazing! Your crumb looks just like the ones we made in class. I’m seriously impressed you took this one to bake at home – bravo!
See you in class 😉
Count me as an impressed fellow (amateur!) baker. Beautiful job on this one, from start to finish. I can only imagine the subtlety of flavor in that bread!
A beautiful Pandoro Susan. Great job!
You know Susan, I think you are taking a liking to these 4 day creations! You’re at risk of losing your hard won reputation. I, OTOH, stay pure to my commitment – I’ve been watching Alton Brown too long now, and if I can’t make these babies in a muffin tin, well … they’ll just go unbaked, I guess.
Notwithstanding my rant, they are gorgeous!
Wow. Fabulous looking. I have always wanted to make this since seeing a recipe in Maggie Glezer’s book.
Molds.
I see two that look as you describe.
One is on sale on Overstock. It’s silicon, tall, shallow points. $40.00 with free shipping today.
http://www.overstock.com/Home-Garden/Paderno-2.2-pound-Nonstick-Break-Mold/3447361/product.html?cid=143937&fp=F&mr:referralID=d3a8beee-ec35-11de-8544-000423c27407
The other is from World Cuisine. They have several different sizes, depending on if you want a 1lb. 1.5 ob. or 2lb loaf.
It is also silicone. $36.00 for the 2lb.
http://www.foodservicewarehouse.com/world-cuisine/47784-10/p367977.aspx
This site has more of what you might be looking for. Made in Portugal with one that looks like yours and a few that look like the Italian one. One is tin. One is metal with non-stick. And a fluted panettone mold.
http://www.fantes.com/panettone-pandoro.html
That looks fabulous! I’d love to try it sometime when I can properly tend to the starter. As thanks, here’s a few links for the desired molds:
Basic metal mold:
http://www.surlatable.com/gs/pandoro-mold-bread-brioche-molds-bakeware-5.shtml
Metal, glass and plastic molds: http://www.fantes.com/panettone-pandoro.html
Scandinavian produced mold from good old Amazon: http://www.amazon.com/SCI-Scandicrafts-Pandoro-Mold-9-Cup/dp/B0012MR1HA
Hello Susan. I´m from Spain, I found you few months ago. I follow you on twitter and I just want to say you that your blog is great. Thanks for sharing it with everyone.
¡Saludos y feliz Navidad!
I’ve only ever had store-bought versions of this bread…I never would have guessed that it is so complicated to make! Kudos to you for forging ahead and getting through it. It looks fantastic!
Thank you soooo much for this wonderful recipe. I started on Friday and at this moment I took the first bite from the most amazing pandoro ever.
By the way, my final rise took 6 hours. Also, I baked them in tall brioche molds. Thank you again.
While the big Pandoro is still proofing in his pan (I think mine needs 18 hours to reach the top of the pan, too) I bake already some tiny little ones in a muffin form for breakfast. Still lukewarm they are a perfect treat for christmas breakfast.
Soft and pillowy, really delicious. Thanks for the recipe and merry christmas to you!
Magnificent Pandoro! I totally forgot and missed the time to make them this year. They are so festive in their starshape.
Never heard of this yeast before, don’t think they sell that here.
Yum! This looks soooo good!
My pans have arrived from fantes.com.
I really like the tall, tinned, fluted panettone pan. (They’re temporarily out of stock but the porcelain mold looks good too.)
I’m not so sure I’m in love with the pandoro pan. It is non-stick and it does have the shallower points and it is generally shaped correctly. But it seems a little…squat. Not as tall as I expected. But maybe the perspective in the photo has mislead me.
I’ll use it anyway.
My Dad’s family celebrated 12th night, or the feast of the three king’s on Jan. 6, the day the three kings gave their gifts to the baby Jesus. So I’m going to make him pandoro. Or panettone. Or both. At least one of them will turn out right. I hope. Increases my odds a bit.
If the pandoro turns out well, I’m going to make some kind of lemon custard, cream filling, slice the pandoro across in one inch layers and put the filling between the slices, offsetting to make a Christmas tree. Then sprinkle with 10x for snow.
I’m going to use white raisins and dried apricots in the panettone.
I don’t have the osmotolerant yeast and no time to send away for it, so I’ll just have to increase the regular stuff. I suppose I could call Williams Sonoma or a few other places to see if they stock it locally, but I kinda doubt they’ll have it.
Wow!
I baked the pandoro today and it is so wonderful and delicious, the best pandoro I’d ever tasted and baked.
I had to made a few little changes in the schedule, so that it fits for me but the result is so stunning.
http://chaosqueenskitchen.twoday.net/stories/6117134
I had my first pandoro this new year’s eve and only tried one little point of the star before leaving. Before I got home I was completely obsessed with finding out where/who/what and how! I got some at my local Italian deli today and I’m in love and I don’t usually keel over sponge cake type cakes. This is heaven and now I’ve found your recipe. It is much more complicated in comparison to a few others ones I found online, so I’m wondering, what subtleties would emerge with yours v. the other ones. They also use yeast. Here are the other versions I found:
http://www.italianmade.com/recipes/recipe383.cfm
http://www.parshift.com/ovens/Secrets/secrets023.htm
And by the way, I love your website-you’re so thorough and awesome-an inspiration. I’m an infrequent bread baker but I love to make challah at least once a year.
Happy New Year to You!
Learnt something new today. Seeing this pretty bread for the first time.
Belated wishes for a very Happy New Year, Susan.
Hi Susan
I’ve also been looking all over for the right kind of pandoro mold, and it appears that sfbi now has them. I’m not sure what capacity they are, but they do look like the Italian type:
http://sfbi.com/pan_d_oro.html
I put in an enquiry about the material and the dimensions. Fingers crossed 🙂
Hello!! I love the detail of the recipes both Pandoro and Panettone. I have a doubt though, I am making either Pandoro or Panettone for Christmas, like 10. I bought the Panettone molds but now I’m thinking about doing the Pandoro recipe. Once I take them out of the oven, should I follow the instructions on your panetonne recipe (put them upside down for many hours for the dough to stretch? with the bamboo sticks?)? or how should I proceed? also, for a mold of 500 gr It’s the same right? 500 gr of pandoro
thank you very much!!
Hi – I found an older pandoro tin mold made in italy – i’m selling it in my etsy shop, if you’re interested:
https://www.etsy.com/listing/100559300/pandoro-panettone-bread-mold-star-shape?ga_search_query=pandoro
Quick question. I only have one pandoro pan and am not totally interested in purchasing another. Is it possible to make the dough up to the final ferment and put half in a prepared pan and the other half in the fridge. Then ferment the first pandoro, cook it, cool it, etc, and remove the second dough ball from the fridge, add an hour or so to its final ferment and cook as before? Have you tried this? Is the dough hearty enough to survive in the fridge? Is it too anxious to rise and will do so even at 41 degrees? I’d love to hear you thoughts. And thank you for the sourdough starter instructions. I have a beautiful starter all warm and happy and doing just as it should!
Dear Susan
My heart goes to “Farine” at this time.
Truely tragic for the whole family …
I have tried the Pandoro recepie – yes i had & still have the fortitude to try it again – Bon:
Did the starter – 1st- 2nd & 3rd dough – no problem – every step the dough was still “living” .
During the final dough , as I was giving it part / part the sugar & the eggs and before the butter, (the hook is on ) ..
The dough was no longer a dough it was more like a cake batter . SO thinking that the gluten was not forming at this time even though there was a whole 3/4 hour during which the mix was in the machine. I finally gave in & added the butter , & changed the hook to the paddle .
Left to rise 2 hours , the thing was rising, but looked more like a cake . So no need to puntch down obviously couldn’t .
So I divided the mix & left overnight for well 12-14 hours – The thing did not move – not an inch .
In the oven after 16 hours – result ? a dense cake !
Where did I go wrong?
Should have not divided into 2 ?
Maybe should have placed in the oven after the 2 hours of the final dough mixing?
Thanks so much
Regards
Katia
hello Susan, this is my first time trying this recipe and I need to ask you something, is the dough really wet? After 10min in the mixer it didn’t develop the gluten, so I tried to work the dough by hand and after 10mins or so it didn’t develop, so I decided to add about 60g of flour, then the gluten started to develop and I was able to make a dough that could be balled, thanks!
so I finaly baked this beauty and I must sayit came out perfect, wayyyy better than the pandoro I had in mind to compare with this one, the dough came out really soft and it tasted just perfect!!
Heavy aluminium pandoro tins can be found here:
http://bakerybits.co.uk/pandoro-cake-tin.html
I have not tried them out yet, but plan to buy a couple soon (once I figure out what size to buy – 2x750g I think).
Andy
I’ve never heard about “pandoro”. This cake has a really unique look. Thank you for sharing. Baking world is so interesting
Really great post shared by your team. Thanks for this.
Really great article found on internet. Keep posting such type of article.
Great share bro/ Thanks for this post. Keep posting such type of informational post.
I was searching this type of article on internet. Atlast i found this. Thanks for this.
Run application on your computer. Great article i found on internet.
I found this blog. I hope you will also like this type of post on android application.
Really great post shared by your team. Thansk for this.
Hello I have successfully made panettone and colomba without the xtra addition of yeast, I was wondering if you think the recipe would still work without it?
Thanks
Apologies. Typo
Elan*
Hi Suzan
Read your recepie, and retead coupls of times , decided to start the min the started was ready.i induldged myself into it , n within 48 hours i had the best taste and the best pandoro ever in my life! Thank you