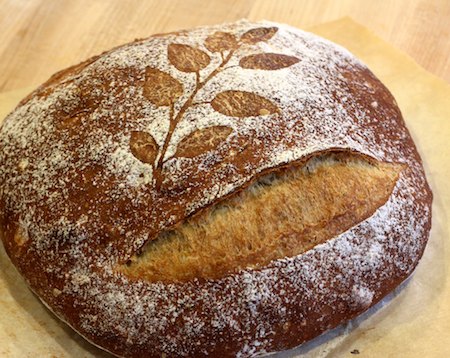
Well, I’m a day (or two) late and a stencil short, but my Rewena Paroa, a traditional Maori bread made with a fermented potato starter — and Lien’s choice for the Bread Baking Babes this month — is finally out of the oven.
Being a New Zealand bread, the decoration should depict a silver leaf fern, and I tried, I really tried, to craft one even half as lovely as Lien’s intricate example. My scissors had other ideas, though, and it was just not happening, so I resorted to the garden. I have no ferns, so I made do with a vine I’m embarrassed to say I don’t even know the name of. Flattened between the pages of a heavy book for a couple of hours, it served as a decent stencil, if you forget that it’s supposed to be a fern.
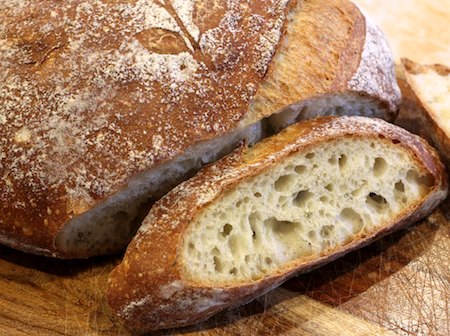
This is a really wonderful loaf, with the softness and red-golden color typical of potato-enriched breads. My dough seemed a bit sluggish so I gave it a longer bulk fermentation and one more fold than the recipe called for, and it paid off with a beautiful open crumb.

Lien’s recipe is below, with my notes in italics. For insights and inspiration from the other Babes, see the links in my right sidebar. Please try it and be a buddy! Send your own Rewena Paraoa to Lien by March 29 to participate.
Rewena paraoa (Maori bread)
(makes one large loaf)
Rewena
100 g potato, peeled and thinly sliced
165 ml water
extra water
165 g strong bread flour [I used my regular flour]
1 tsp liquid honey
Dough
400 g strong bread flour [I used my regular flour]
1 tsp salt
20 g liquid honey
1/4 tsp instant active dried yeast
1 1/2 tablespoons fresh rosemary leaves, roughly chopped
150 ml water
330 g rewena, as above
additional flour, for dusting
4— 5 ice cubes, for creating steam in the oven [I used my usual steaming method]
To prepare the rewena, place the potato and water into a saucepan and then boil until the potato is soft, leave the lid off. Mash the cooked potato in the water and add extra water until you have 250 g in total. Put into a bowl and cool until lukewarm. If the mashed potatoes are too hot, it will cook the starch in the flour. Mix in the flour and honey to make a soft dough. Cover with plastic wrap and set in a warm place until the dough ferments. After one day you’ll see a few bubbles on the surface, after two days a lot. You can use it after two days or up to three, if you’ll leave it longer it’ll be over its strongest point. [I used mine after 2.5 days]
To make the dough, put all the ingredients into a large mixing bowl and, using a wooden spoon, combine to form a soft dough mass. (You may need to adjust with a little more flour or water.) Knead the dough in the spiral mixer for 8 -10 minutes (starting on speed 1 or 2, halfway on speed 3) until the dough (almost) clears the sides and the dough is smooth and elastic. [I mixed until I could pull a decent, although fragile, windowpane.]
Place the dough into a lightly oiled large bowl, cover with plastic wrap and leave in a warm place. Once the dough has almost doubled in size (this will take approximately 1 hour), tip the dough onto the bench dusted with flour and gently knock it back by folding it onto itself three to four times. Return the dough to the lightly oiled bowl, cover with plastic wrap and leave for a further 30 minutes in a warm place. [My bulk fermentation was about three hours, with folds at one and two hours.]
Fold the dough to form a large rectangle. This doesn’t need to be exact, just as long as it’s tight and compact. Place on a baking tray lined with non-stick baking paper and cover with plastic wrap. Allow to prove for approximately 60-120 minutes, depending on room temperature. [Mine proofed about 2 hours and 15 minutes.]
(optional) Cut a silver fern-leaf or Maori moko design stencil out of stiff paper. Remove the plastic wrap from the dough and place the stencil on the dough’s surface (I sprayed the stencil with grease, otherwise it would have got stuck on the dough), then with a fine sieve filled with a little (white rye) flour, lightly dust flour over the stencil so you are left with a pattern on the loaf. Carefully remove the stencil. Using a sharp knife or razor blade, cut around the edge of stencilled pattern.
Preheat the oven to 220ºC [425F] with a baking tray or baking stone inside (the stone should really be hot!) and a small ovenproof dish on the bottom shelf. Place the loaf in the oven [I kept mine on the parchment when I placed it on the stone] and quickly throw 4-5 ice cubes into the small ovenproof dish and close the oven door. [I used my usual steaming method.]
Bake for 10 minutes and then turn the tray around, reduce the oven temperature to 200°C and bake for a further 20-25 minutes, or until the crust is a dark golden brown and the bottom sounds hollow when tapped. [Mine baked a total of 34 minutes, plus another 10 minutes with the oven turned off and the door ajar.] Remove from the oven and place on a cooling rack.
I am constantly amazed at how many variations on something as basic as bread there are. I don’t know if I’ll make this bread in time to make the cut for the bread baking babes, but I hope to try it soon. (I’m still trying to finish the BBA…I’ve been almost done for months and months now).
Ohhh nelly! Thanks for the notes, I will dive into this next week!
I’ve been thinking of trying a potato based bread. This makes me think I should be thinking harder!
That crumb looks amazing.
I’ve been looking for a Maori turtle to put on the Rewena Paraoa, but your local vine leaf looks beautiful too. And looking at this crumb makes sure I will give it a try this week.
Brilliance! Why didn’t I think of using a real life stencil? Totally spot on to give some longer rise and turns, great loaf, love the color!
Your bread always looks so beautiful! I am intrigued enough by this recipe to try it. Thanks for the extra notes and comments and the ideas for the stencil.
Gorgeous bread, Susan…. loved the way you did the stencil, and the crumb is simply perfect!
Can I ask a question? Once I am back in my regular kitchen, is it possible to join the bread baking babes, or is the group closed?
I love that stencilling, I think the Maori’s use a real leaf too! You’ve got the best looking holes, perfection!
Your loaf looks wonderful, Susan (no big surprise there – your bread always looks wonderful) and I love the stencilling! I’m thinking that perhaps I should reverse my stencil to do what you did. It might be less inclined to stick so badly….
Oooooh, I just had a thought! I wonder if I printed the stencil on parchment paper if it would be less inclined to stick.
Beautiful loaf Susan…and the vine works fine as a stencil. Bet that leaving the loaf in the oven to cool, with the door propped open, added to the crustiness. Love the crust and the open texture!
I’ve always wanted to get into bread making but I always get confused when it comes to working with starters. Your loaf looks SO delicious!
A great bread-recipe! Thanks.
That is sooooo beautiful!
Why must people insist on making food that looks too good to eat? It just means tension between my aesthetic impulses and my greedy ones!!!! Doh! No pun intended.
I LOVE your stencil and your gorgeous defining slash beneath. That would have been SO much easier. Beautiful loaf!
what a clever babe you are to go out into the wild and find a stencil for your bread. saves you all that darn cutting
your bread looks gorgeous. love the open crumb.
This is such a beautiful bread!
Cheers,
Another gorgeous bread. Love these little leaves. Isn’t that the perfect loaf for a spring celebration?
Hi Susan, a real rewana doesn’t require any yeast at all. We usually use sugar, and if you keep even the tiniest bit of the bug (which you have called rewana), you will never have to make it again. When not in use, refridgerate it and when you want it, you feed it up (with flour, sugar and tepid water which will bring it back to the bubble stage). Will last forever in your fridge…..great way to pass down the generations.
HI Susan, Great recipe, however, I wouldn’t recommend using a Moko pattern stencil, it would be pretty offensive and appropriative. It’s so cool you engaged in this bread but please don’t encourage the lessening of significant cultural markers such as t? moko.
Sylvia, Thank you for this thoughtful reminder about cultural appropriation. You are absolutely right. I’ll strive to do better.