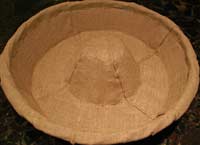
 It’s time for another BreadBakingDay, and host Eva (Sweet Sins) chose “Shape” as this month’s excellent theme. I opted to make a couronne Bordelaise (Bordeaux-style crown), because it was about time I put my oddly-shaped couronne banneton, which I’ve had for a few months now, to use.
What I wish I had figured out before I spent a small fortune ordering this 12″ linen-lined banneton from France, however, is that you absolutely don’t need it. You can rig up a perfectly good stand-in with an inverted cereal bowl inside any flat-ish basket (even a large pie plate would do), and a piece of linen draped over them. I made one couronne in the “real” banneton and one in the mock-up, and I truly couldn’t tell the difference in the final loaves. The diameter of my basket is about 11″, and of the bowl, about 4.5″.
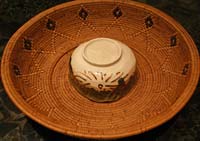
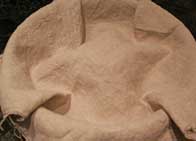
Although I believe this shape is traditionally done with pain de campagne, any medium-hydration lean dough should work. I used my favorite Norwich sourdough.
For one couronne of 11-12″ diameter, you need 750 grams of dough. Divide the dough into six pieces of 100 grams each, and one piece of 150 grams. Shape the pieces lightly into balls and let them rest, covered, for about 20 minutes. Flour the linen lining your basket.
Roll the 150-gram ball into a flat disk about 10″ in diameter. Drape it evenly over the center hump in your basket. It should reach about halfway to the basket’s outside wall.
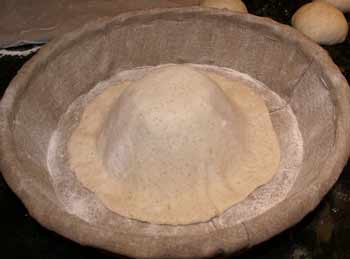
Shape the remaining six pieces into tight balls and place them seam side up in the basket, evenly spaced. They will not touch each other at this point.
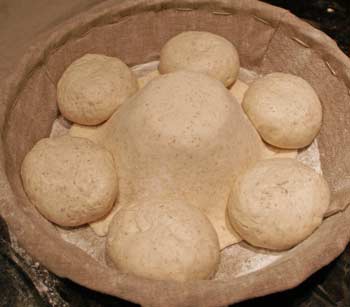
With a razor blade or sharp knife, cut the center of the disc so that it has six points centered over the six balls, like this:
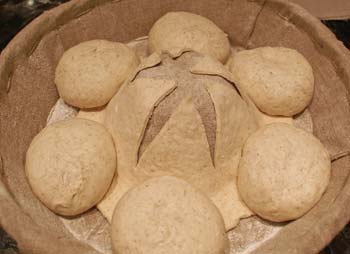
Fold each point back over its corresponding dough ball.
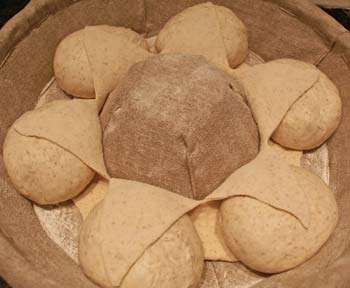
Proof the loaf as your recipe directs. By the end of the proof, the dough should be expanded sufficiently so that the balls are touching and you have a cohesive loaf. When it’s time to bake, invert the loaf onto the peel. The “collar” will look like it has glued itself to the balls (and it has), but it should pop up during baking. No slashing required!
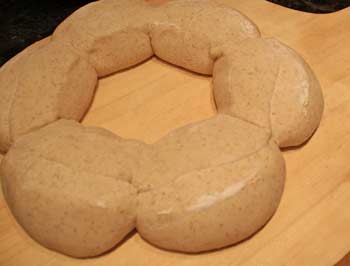
Bake as directed by your recipe. You may need to bake slightly less time than you would bake a boule or batard of equal weight, since the couronne has a greater surface area.
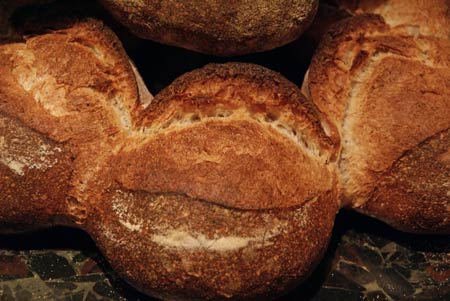
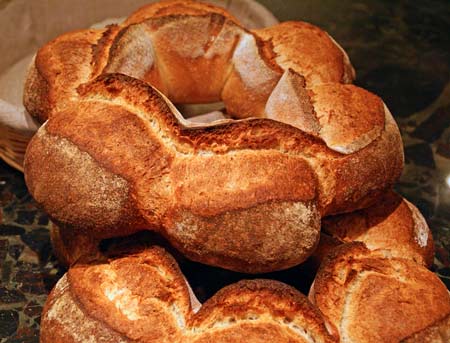
Et voilà!
Spectacular! Thank you for the detailed post with mouth-watering photos. Alas, I do not yet have the courage to attempt a sourdough recipe. I’m still a beginner in bread-baking. But I love the look of your couronne, and will try this shape soon thanks to your great explanations.
Amazing! Wait till I show this to my friend! (she has a similar couronne banneton and is forever teasing me with it). Love the flat disk invention. Great bread as always, a real stunner!
Thanks for the detailed instructions! The result is georgeous!
gorgeous! i need to muster some ambition before attempting something like this, but i can drool over yours for now!
Looks like a fun way to shape a king cake for Mardi Gras, too! Thanks for the inspiration, as always!
Susan this is an amazing, beautiful couronne.
It is a shape of bread I have never attempted so far, but with your instructions I will soon! Thank you!!
Perfect results – as always. The idea to replace the couronne banneton with a basket and a bowl is great. Thank you!
Thank you for the detailed tutorial, this looks absolutly lucious.
I echo everyone above–great substitution suggestion, and thank you for saving me a few dollars! 🙂
Wow!
-Elizabeth
Wow! Absolutely amazing. Far, far, better than my feeble attempt at making a couronne shape. Thanks for posting your detailed instructions!
Wow, that is such a beautiful loaf! Everything about it, the color and shape are fantastic.
I just learned about the “make your own banneton” trick a couple of weeks ago. What are you lining your homemade banneton with? I tried a linen dish towel. It worked ok. Do you wash the cloth you are using afterwards? I have heard some people leave their banneton a little less than hygenic because it keeps a little bit of yeast on the surface.
Sorry for all the newbie questions. :0)
Wow that is gorgeous. And yet I feel I could do it–you give the best pictures and instructions (I meant to tell you I made your panettone to huge acclaim over xmas but the post was closed to comment). Now I want to try this one!
Wow I’m spechless! The couronne is stunning!
I’m in serious awe. That’s SUCH a gorgeous bread you’ve made! The tutorial was really great. Thanks for posting it!
Really nice, I also looked to France to buy a basket, so expensive! You would think someone here would make these things or import?
Jeremy
Oh my goodness Susan that is spectacular! I can’t wait to try it! Really beautiful!!
Abolutely stunning! You are the Master!
When I saw the photo, my first thought was “how on earth do you get such perfect slashes?” – now I know thanks to your tutorial! Definitely need to try this asap… Thanks for participating!
Absolutely amazing. Someday when I really want to impress someone I may have to try that. Although I doubt my results would be nearly as impressive as yours.
Astrid: Thanks, I hope you have fun with it.
Baking Soda: Yes, those Bordeaux bakers really hit on something.
Ulrike: Thanks and you’re welcome.
Katy: I’m pretty sure you can do this.
Helen: Shall I look for a green, yellow, and purple couronne on your blog?
Baking History: You’re welcome, I think you’ll like it.
Petra: Thanks!
Oliverde: You’re welcome, thanks for stopping by.
Chou: Wish I had though of it sooner!
Elizabeth: Thanks!
Boaz: Your type of couronne, although it looks simpler, is actually harder than the Bordelaise, IMO, and I think yours came out just lovely.
Mimi: A linen dishtowel is fine. I use unbleached heavy weight linen from a fabric store. I never wash it. Just let it dry thoroughly before storing to prevent mold, and scrape off any visible dried dough.
Laura: I’m sure you can do it. Have fun! I’m not sure why you had trouble posting a comment on the panettone, but I’m glad you liked the recipe.
Zorra: Thank you!
Colette: You are welcome. Thank you for visiting me and leaving such a nice comment.
Jeremy: The shipping to US is outrageous. I searched everywhere for one to buy here, but I’m convinced there is no source. I guess there is just not much demand.
Tanna: Thanks, I’ll look for a couronne from you soon!
Tartelette: More like an apprenctice, but I always like to learn how to do new things.
Eva: Yes, this is good for people who have a fear of slashing. Thanks for hosting BBD!
Tracy: A lot of bang for the buck with this one, it’s really not hard.
Your beautiful bread takes my breath away. If there was a prize at BBD you’ve just got it.
Gosh after reading, I only found that it is simple. I got to say you did it so sell and so easy!
I just fell in love with this gorgeous bread. I will have to give this a try. I have a sort of rising basket like that, so I could use that with a towel in it. It looks great. I agree with Aparna, this is a price winner!!
BTW I also saw your other photo explanations about shaping (a.o. fendu) really clear and helpful. Thanks!
Hi Susan, You are now officially my number one bread baking resource on the internet. Jeremy’s stirthepots.com was number one, mainly because of the interviews (and cuz J is my friend) but you have edged him out of the number one spot. I am trying to “work” my own blog as much as I can but invariably I usually check in here before heading to my blog. If I see that there’s a new post, it spurs me to do something, and work hard at it, ’cause WildYeast is now the standard by which I measure. This recent Couronne Bordelaise is outstanding, it’s a must do on my list of breads to conquer…er…master….er…ok, get to know. You may recall that I had good raves when I made your version of the Semolina Baguette with Pine Nuts, Fennel and Dried Figs, that was an exceptional formula that garnered many compliments on New Years Eve. We were going to add it to our line up to sell, the additions are considered to be premium and for now we won’t produce it, but it’ll be a definite seasonal add for Easter or next Christmas. We have been making Ciabatta for a couple of years with mixed inconsistent results. Making up the final dough was such a matter of timing; quite often the oven was simply way too hot to bake whenever the Ciabatta was screaming “NOW!”
I can tell you that while under-proofed bread is a disappointment, over-proofed bread makes you want to DIE. Anyways, I kept looking at your form’ for “Overnight Ciabatta” thinking, yes this is a good practical idea, retarding in bulk, we used to do this with a few of our early sourdoughs, the final dough would be mixed the night before we baked and left in a covered bin in the cantina where it’s cold. The results were very good as long as the leaven was robust and properly fed, good spring and excellent flavour. To make a short story long, your technique showed me the way again and I’m very pleased to say that this will be the new way for this bread. Thanks a million, it’s great to be able to learn continuously and I appreciate your blog so much. The wheels are turning.
I do prattle on don’t I?
Happy baking.
-David
PS: One more thing, the folding video you posted also got the wheels turning. I incorporate folding into all of the slack doughs we do, but it’s just good seeing someone else doing it. How come no sound?
woW….woWWWWW..WoWWWWWW….
Susan, the bread is of such beautiful form and color and texture, it’s such expression of, for lack of a better word, beauty … and your visual instruction is such a perfect tutorial. Thanks for sharing.
You have inspired me over the Fendu shaping and now this Couronne Bordelaise.
Last weekend I just happened to make my weekly Norwich SD hence had the dough ready; when I checked out your latest post and on the spur of the moment I decided to try it out and I am glad I did.
Please check out the photos to see the outcomes as well as my Couronne Bordelaise stand-in, inspired totally by you:
http://www.flickr.com/photos/sierravalleygirl/2248135291/in/set-72157600905528460/
I also baked other types of bread the same day: they all came out with tight crumbs. I think the house was a bit cold hence the dough didn’t get proofed enough.
And I tried at the same time to convert a Hamelman’s recipe to a sourdough one… too many new things to introduce in one day of baking, etc.
I wanted to post the photos and send this comment to you right away but the last big storm in the Sierra caused the loss of Internet connection for a good few days, then I was busy with other things until now…
Last but not least: you’re a great “sensei”! Thanks!
Aparna, I’m glad BBD is strictly non-competitive but thanks so much for the compliment!
Big Boys, yes, simple — that’s why I like it!
Lien, you’re welcome. I really enjoy doing different shapes and I’m glad you find the photos helpful.
David, you know I am a big fan of both your and Jeremy’s breads, and you definitely have me blushing. I’m sure the ciabatta from your wood-fired oven is just outstanding and it makes me happy that you found some inspiration here. No sound on the video because I don’t think anyone really wants to hear me talk 🙂
Poonam, thanks! Welcome to my blog, I’m glad you stopped by.
Mily, what a gorgeous couronne! And as I have said before, all of your breads are fantastic. I’m especially liking the 80% rye with flax and sunflower seeds.
Hi Susan,
I spotted this piece of art on your blog and have been yearning to try it out. Last week-end I got my chance. I’ve never baked with sourdough before, but had a spelt wheat recipe lined up for trying, so I used that instead. Unfortunately I committed several silly mistakes and it was far from your beautiful couronne. But I’m not going to give in just yet. Here are some photos for a laugh.
From looking at the final result, I would never have worked out how to do a couronne (never even heard of the concept before), so many thanks for the instructions and pictures. Panettone is next, I think. Oh dear, there goes the waist line…
Thank you, thank you, thank you,
Caramella
Absolutely amazingly inspiring!
Even though it’s 10:30pm I am running to the kitchen to get my dough ready to make this tomorrow!!
This is a spectacular-looking bread. I happened upon your site because I have sourdough proofing right now, getting ready for the oven and I have no banneton, so looking for subs. I am so glad I found your site – I’m hooked!!
hi i like this way tooooo much and i will try it ti day
thanx
Hi Susan,
I just followed your instructions. Thank you a lot.
I wrote about the shaping and baking on my blog, check it out if you like to!
http://oventv.wordpress.com/2009/07/16/5-grain-levain-couronne-experiment/
Salome
Wow, what a great couronne! I mentioned this photo tutorial in my post about my pain de campagne. I made an épi then, but if I had found your post earlier, I definitely would have tried the couronne. Next time…
Susan,
I don’t know what to say, I took a look at this post and had to make it. I am an experiences bread baker, and work at a bakery, so I just followed your directions and even made it with your Norwich sourdough variation and it came out swimmingly! Beautiful, easy, delicious!
Take a look how gorgeous:
http://yfrog.com/hsnalbgj
Thanks for the inspiration!
Nick
Thank you for the beautiful step by step. It worked a treat tonight and you’re right it’s not as hard as it looks. As I am incapable of rolling out circles, I just got a dinner plate and cut the dough roughly round it once I had rolled out my usual ‘not circle’ shape.
Wow!!! It’s almost too beautiful to eat!!! Thanks so much for all the step-by-step photos and for showing us how to make this without the special banneton. You’ve definitely inspired me to make this!! Thank you!! 🙂
Thank you for your detailed explanation on how to make this gorgeous looking bread and also improvising for the basket. I made this bread for the first time last weekend and I can truly say it turned out perfectly. I made a larger version and it was like a centre piece in the middle of the table with all the family tucking in. It was also a big talking point as to how it got it’s final shape, it looks so much more complicated than it actually is. Please keep your tips coming, they are much appreciated.
Thank you, thank you for your great recipes, explanations, photos and tips! I’ve only just started baking my own bread and I am so inspired by your work, I mixed my own sourdough starter this morning. Can I wait the 5-7 days before I start folding, proofing, shaping and slashing ???? It’s going to be a challenge!!! Can’t get any of the flour brands that you use in Melbourne Australia ….. but nothing ventured, nothing gained!
Can’t wait to see more of your baking.
This is the most beautiful bread I have ever seen.
Dear fellow Susan,
Thank you for posting this recipe (12 years ago!), as well as the basic recipe for Norwich Sourdough. I tried my hand at making the couronne Bordelaise and third time was the charm. I did a test run two days ago and had some problems with execution (though the bread itself was tasty). I then made two more, baked this morning — New Year’s Day 2020. The second loaf out of the oven (the third overall) was near perfect. Pictures are on my blog at The Fresh Loaf, at http://www.thefreshloaf.com/node/62030/couronne-bordelaise.